May 17, 2010

OPI Shrek Forever After Collection - Spring 2010

OPI Shrek Forever After Collection - Spring 2010


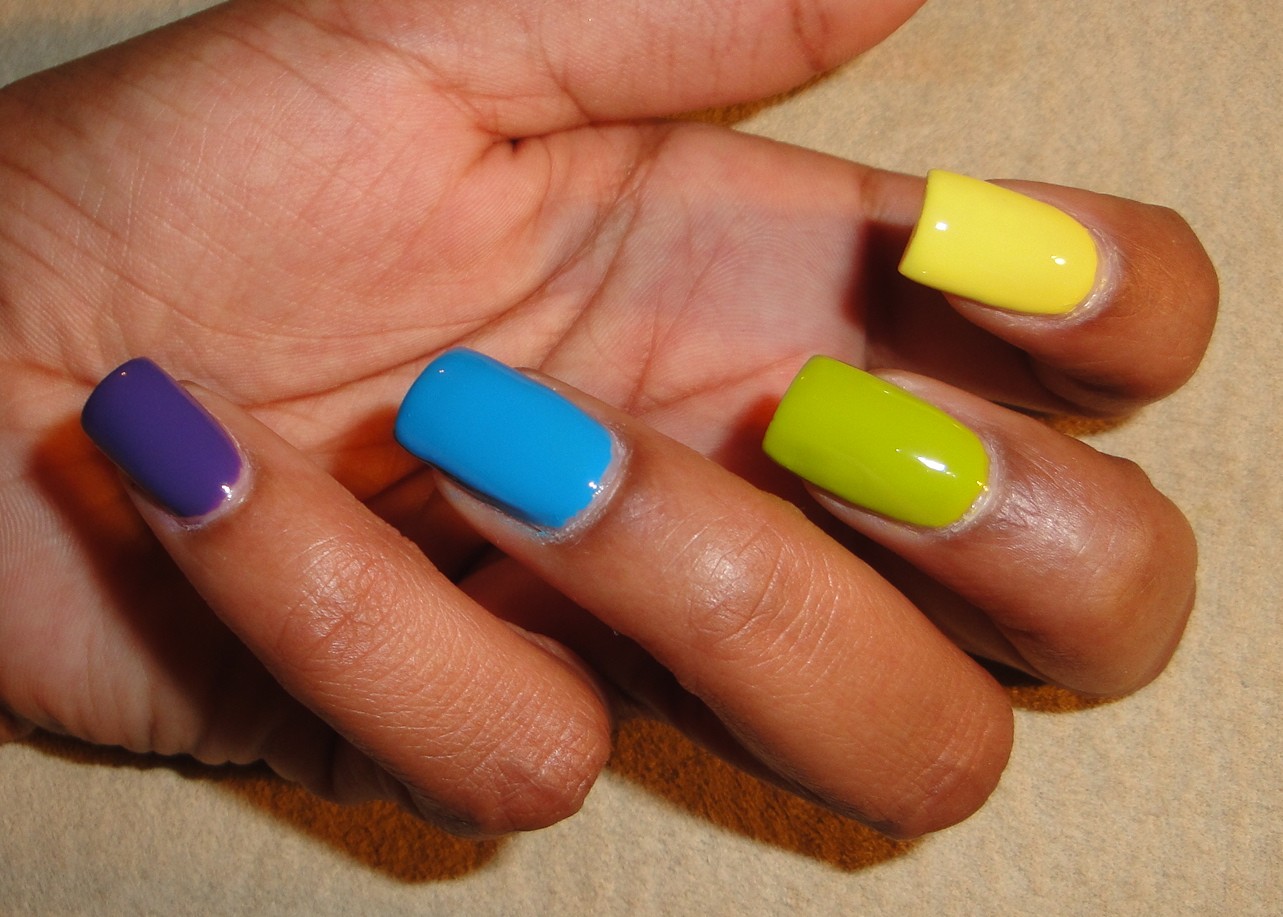
This is a new OPI nail polish collection for Spring 2010 that celebrates the upcoming movie - Shrek Forever After. The collection has great bright spring colors that are perfect for the season and even for summer as well! They are have nifty fun names based off the Shrek characters which I think really suits the theme as well as the movie. BTW I LOVE Shrek!!!!

I picked up 4 of the colors:
  • Fiercely Fiona - I would describe this as a green toned yellow
  • Who The Shrek Are You? - To me this is a true chartreuse green color
  • Ogre-The-Top Blue - This is a true bright electric blue
  • Funky Dunkey - This one is a great deep grape color

May 14, 2010

'Cloudy Print w/ Skinny Jeans' Outfit

'Cloudy Print w/ Skinny Jeans' Outfit

So since my first outfit was well received I decided to add another post showing a casual day work outfit. We are allowed to wear jeans on Mondays and Fridays so of course I take advantage of that.

I'm wearing a cloudy grey and black print flowy top with black skinny jeans. I am wearing my gladiator inspired platforms heels with black and silver accessories. All items came from Wet Seal, Forever 21 or Charlotte Russe. 


'Metallic Smoke' Look

'Metallic Smoke' Look

This look is a metallic smoky look as you can tell...using MAC Pigments. I definitely recommend picking up the MAC Metallic Pigments in Silver, Platinum or Bronze because they are the ultimate metal pigments.


Eyes:


PRIME:
I started off with Urban Decay Primer Potion all over my lid up to the brow bone. I also applied MAC Layin' Low Paintpot (matte creamy beige) all over my lid up to my brow bone as my primary base. I also applied MUFE #3 Aqua Cream Color (metallic silver) as a secondary base just on my lid.

COLOR:
On the tear duct and inner lid, I applied MAC Pure White Pigment (matte white).
Next on the lid, I applied MAC Platinum Pigment (metallic platinum).
On the outer lid and crease I applied MAC Black Black Pigment (matte black).
For blending I used Smashbox Nude Eyeshadow (matte nude).
For highlight I used MAC Ricepaper Eyeshadow (shimmery champagne).

BROWS:
My brows are filled in with MAC Eyebrow Pencil in Stud.

DEFINE:
I lined my upper lashline with Wet 'n' Wild Creme Eyeliner in Black.
I lined my lower waterline and lashline with Inglot #87 Gel Eyeliner (matte teal) .
I used MAC Opulash Mascara for my lashes and added Beautee Senses Demi Pixie Eyelashes for effect.

Lips:


POLISH:
MAC Brave New Bronze Lipstick and MAC Chai Lipglass.
 
 
Face:


FINISH:
I used NARS Sheer Glow Foundation in Tahoe with MUFE Full Cover Concealer in #12 under my eyes. I set with MAC Blot Powder in Dark.
I used MAC Azalea Blossom Blush Ombre for my cheeks.

May 13, 2010

Work Outfit - Grey on Grey


Work Outfit - Grey on Grey

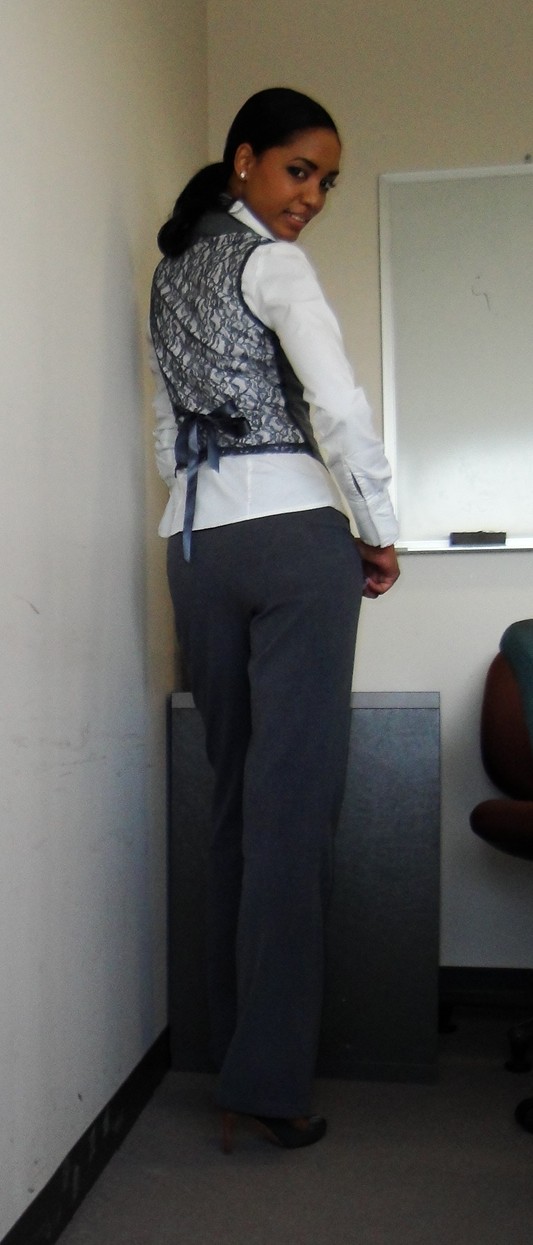
Hey guys! Have you ever wondered what I really look like? From head to toe? Or what I wear to work on an average day? I hope so...because this is what this post is about...LOL!

So this outfit if choice is grey on grey featuring a white button down shirt, grey slacks, grey lace back vest and grey peep toe pumps.

Let me know if you want to see more of these posts or if I should stick to makeup...


May 12, 2010

Update Update Update!!!

Update Update Update!!!

This is just a quick post to mention some things that are afoot in the beauty industry....
  1. The NYC Makeup Show is on this weekend, May 16th and 17th at the Metropolitan Pavilion in NYC. I will be there on Sunday May 16th bright and early and will be spending a few hours there with my friend. Be sure to say hi if you spot me in the crowd.
  2. Sephora now has the Make Up For Ever Aqua Cream Colors available online. Link
  3. Sigma Makeup has the SS197 Flat Top Synthetic Kabuki Brush back in stock. Link
  4. MAC To The Beach Collection Preview Parties will be in full swing on May 18th. I will in attendance at one in Long Island and will report back.

'Blackened Sunshine' Look

'Blackened Sunshine' Look

In celebration of the terrible weather I decided to darken my sunshine....LOL! It's raining and pouring and cold and spring is still waiting to be sprung. This could also be considered a bumblebee look but I was thinking of sunshine instead...


Eyes:


PRIME:
I started off with Urban Decay Primer Potion all over my lid up to the brow bone. I also applied MAC Layin' Low Paintpot (matte creamy beige) all over my lid up to my brow bone as my primary base. As a secondary base on my lid I applied Inglot #84 Gel Eyeliner (matte yellow).

COLOR:
On the tear duct, I applied MAC Blanc Type Eyeshadow (matte ivory).
Next on the lid, I applied Sugarpill Buttercupcake Eyeshadow (matte yellow).
On the outer lid and outer V I applied MUFE #26 Pure Pigment (matte black).
For blending and the crease I used Smashbox Nude Eyeshadow (matte nude).
For highlight I used MAC Ricepaper Eyeshadow (shimmery champagne).

BROWS:
My brows are filled in with MAC Eyebrow Pencil in Stud. I am trying to grow thicker brows at the moment.

DEFINE:
I lined my upper lashline with Wet 'n' Wild Creme Eyeliner in Black.
I lined my lower waterline with Loreal HIP Creme Eyeliner in Black .
On my lower lashline I also smudged a bit of MUFE #2 Metal Powder (yellow gold).
I used MAC Opulash Mascara for my lashes.


Lips:


POLISH:
MAC Totally Bang! SuperGlass.


Face:


FINISH:
I used NARS Sheer Glow Foundation in Tahoe with MUFE Full Cover Concealer in #12 under my eyes. I set with MAC Blot Powder in Dark.
I used MUFE #10 Sculpting Blush for my cheeks.

May 11, 2010

'Pinky Purple' Look

'Pinky Purple' Look

First off, I'd like to say I'm back and I missed you guys so much! I had a great trip to Istanbul, Turkey! It's a beautiful place to visit and this was my second time there (for work). I wasn't wearing any makeup for a week and so I wanted to jazz it up a bit. This is a look using purples and pinks and black.


Eyes:

PRIME:
I started off with Urban Decay Primer Potion all over my lid up to the brow bone. I also applied MAC Layin' Low Paintpot (matte creamy beige) all over my lid up to my brow bone as my primary base.

COLOR:
On the tear duct, I applied MAC Blanc Type Eyeshadow (matte ivory).
Next on the inner lid, I applied MAC Cool Pink Pigment (matte light pink).
Then on the middle of the lid, I applied MAC Process Magenta Pigment (matte bright pink).
On the outer lid and crease I applied MAC French Violet Pigment (matte medium purple).
For the outer V I used MAC Black Black Pigment (matte black).
For highlight I used MAC Ricepaper Eyeshadow (shimmery champagne).

BROWS:
My brows are filled in with MAC Eyebrow Pencil in Stud. I am trying to grow thicker brows at the moment.

DEFINE:
I lined my upper lashline with Wet 'n' Wild Creme Eyeliner in Black.
I lined my lower waterline with Loreal HIP Creme Eyeliner in Black and Inglot #88 (light sky blue) Gel Eyeliner.
On my lower lashline I also smudged a bit of Inglot #82 (purple) Gel Eyeliner.
I used MAC Opulash Mascara for my lashes and added Beautee Senses Smashing Eyelashes for effect.


Lips:

POLISH:
MAC Blooming Lovely Lipstick and MAC Fab Frenzy SuperGlass.
Face:

FINISH:
I used NARS Sheer Glow Foundation in Tahoe with MUFE Full Cover Concealer in #12 under my eyes. I set with MAC Blot Powder in Dark.
I used MUFE #12 Sculpting Blush for my cheeks.

Jessica Simpson Platform Shoes

Jessica Simpson Platform Shoes

Take a gander at these lovelies! LOL! These are my Jessica Simpson Platforms from Love My Shoes. They are a killer 6 inches high with a hollowed out platform heel. When I saw them I had to have them because of the unique design. Surprisingly they are not difficult to walk in at all and they put me a whopping hieght of 6' 2"...taller than most guys here at work...


May 3, 2010

Just a note...

Just a note...to say....

I'll be out for the rest of the week traveling for work : (

I'll miss u guys! But I promise I'll be back with much more..stay tuned : )

Natural Look with Bold Lips

Natural Look with Bold Lips

Today I went for a natural look (as natural as makeup can allow...LOL) with a BOLD lip. This look gave me a chance to use some new products and some forgotten gems.
Eyes:

PRIME:
As always I started off with Urban Decay Primer Potion all over my lid up to the brow bone. I also applied MUFE Full Cover Concealer #12 all over my lid up to my brow bone for a neutral base.
 
BROWS:
My brows are filled in with MAC Eyebrow Pencil in Spiked.

DEFINE:
I lined my lower waterline with Loreal HIP Creme Eyeliner in Black.
On the outer part of my lower lashline I also smudged a bit of MAC Blackline Pearlglide Eyeliner.
On the inner part of my lower lashline I used MAC Chromagraphic Pencil in NW25/NC30.
I used MAC Opulash Mascara for my lashes and topped them off with Ardell #305 Accent Lashes.


Lips:

POLISH: 
MAC Violetta Lipstick and MAC Rock Out Lipglass.


Face:

FINISH:
I used NARS Sheer Glow Foundation in Tahoe with MAC Studio Finish Concealer in NW35 under my eyes. I set with MAC Blot Powder in Dark.
I used MUFE HD Microfinish #8 Blush for my cheeks. 


'Royal Sugar' Tutorial

'Royal Sugar' Tutorial

So this video is a tutorial for my Royal Sugar Look I previously did here.

First time actually doing a live makeup tutorial. It was so hard to stay under 10 minutes and I do not have a program to merge different  videos so I wasn't able to add an Intro or an Ending. But here it is....feedback welcomed... : )

'My Must Have Brushes' Video

'My Must Have Brushes' Video

Hi guys! So I already did a post on my Must Have Brushes but I thought  I would also do a video to show the brushes and talk about how I use them. So here goes....


My Must Have Brushes Link
Mascara Fan Brush Tip Link


Apr 30, 2010

The Instyler Quick Review

The Instyler Quick Review

Yep! I broke down and got the Instyler!

Many of you have probably seen the infomercials about the Instyler Rotating Hot Iron Hair Styler. I decided after much debate to get my hands on it during their $14.99 30-day Trial Offer. So if I didn't like it I wouldn't lose too much. 

Well well well....after my look of the day today, many of you guys commented on my hair. So I decided to do a quick review of the device.

 
Review:


At first it was tricky to use. I had to figure out what angle to hold the iron and how slowly to pull it through my hair and how much hair to do at a time. I recommend watching the online videos at www.getinstyler.com before attacking your own hair.


How did I use it? I washed my hair and conditioned it and let it air dry. I did NOT add any products to my hair because the website says to use on CLEAN hair. I made sure my hair was 95% air dry before using the iron. I used the highest heat setting and let the iron heat up for about a minute. I sectioned my hair in 3 inch sections and worked from back to front.


Section by section, I detangled with my rat-tail comb through to the ends. I then used the rotating barrel to press and rub against my roots to get them straight. Then I clamped my hair between the barrel and the brush and slowly (SLOWLY) moved the iron through my hair down to the ends. I used the device with the barrel under the hair section and the brushes on top. Once my hair was between the two parts, I also slightly turned the iron so that the barrel was aiming up to get a nice curl. I did stay a little longer on the ends to make sure those were shiny and straight,


I didn't use any shining drops and hairspray and taaddaaa! It looks shiny and healthy and bouncy with no additional hair product. So far I am very happy and my TRIAL will become permanent!


>