Jun 11, 2010

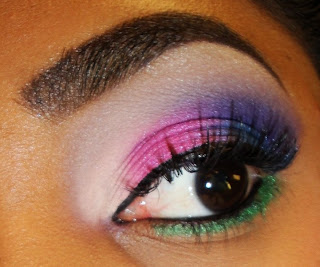
'Raspberry Punch' Look

'Raspberry Punch' Look

So I started off this look with the Naked Cosmetics Shock Effect Pigment Stack in hand and it totally failed. I am not a fan of these pigments at all...they are borderline useless to me. Let me know if you guys want a full blown review on these because I don't want to just bash the products and hear myself complain.

Anyhow onto the look which I had to resuscitate with Inglot eyeshadows....after I chucked the Naked Pigments out of my way.


Eyes:

PRIME:
I started off with NARS Smudge Proof Eyeshadow Base all over my lid up to the brow bone. I also applied MAC Layin' Low Paintpot (matte creamy beige) all over my lid up to my brow bone as my primary base.

COLOR:
On the inner lid I applied MAC Blanc Type Eyeshadow (matte ivory).
Next the middle of the lid I applied Inglot #362 Eyeshadow (matte raspberry pink).
On the outer lid I applied Inglot #371 Eyeshadow (matte vivid blue).
For the crease I used Inglot #388 Eyeshadow (matte purple).
On the brow bone and for the blending I used Smashbox Nude Eyeshadow (matte nude).
For highlight I used MAC Vanilla Eyeshadow (matte ivory).

BROWS:
My brows are filled in with MAC Eyebrow Pencil in Stud.

DEFINE:
I lined my upper lashline with Stila Stay All Day Eyeliner in Black.
I lined my lower waterline with Loreal HIP Cream Eyeliner in Black.
I lined my outer lower lashline with MUFE #22 Aqua Cream (shimmery green).
I used Covergirl Lashblast Mascara for my lashes and added Beautee Sense Princess Lashes for effect.


Lips:

POLISH:
I used NYX Narcissus Lipstick with MAC Fab Frenzy Superglass.


Face:
 
FINISH:
I used MUFE Mat Velvet + Foundation in #70 with MUFE Full Cover Concealer in #12 under my eyes. I set with MAC Blot Powder in Dark. I used MAC Blush Ombre in Ripe Peach for my cheeks.

Jun 10, 2010

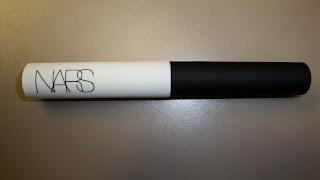
NARS Smudge Proof Eyeshadow Base - Thoughts...

NARS Smudge Proof Eyeshadow Base - Thoughts...

From NARS -

New! No smudging, creasing or caking. The NARS Smudge Proof Eyeshadow Base is the insider trick of the trade. Never looking heavy-handed, this lightweight eye primer creates a seamless canvas that keeps cream and powder color looking brilliant, fresh and just-applied, all day.

A polymer and mineral powder blend creates a firm grip on color ensuring hours and hours of gorgeous wear. Fortified with special deep-sea and antioxidant rice extracts, the Smudge Proof Eyeshadow Base dries on contact and keeps the delicate eyelid smooth and prepared for color application.

Extends the wear of eyeshadow, eyeliner and eyebrow pencil.
Instantly transforms to a matte finish and preps skin for color application.
Maximizes color intensity.
Dermatologist and ophthalmologist tested. Fragrance free

Net Wt. 0.28 Oz./8g
Price $24
*******************************

My Experience

My Four P's...

Price
The price of the NARS Smudge Proof Eyeshadow Base  is $24 for 0.28oz./8g. This is quite a bit pricier than the other popular eyeshadow primers on the market, namely Too Faced Shadow Insurance which retails for $17 for 0.35oz. and Urban Decay Primer Potion which retails for $18 for 0.34oz. So you get less product for a good $6 or $7 more..interesting note - this is an extra $1 for every oz. you lose....

This price really irked me but NARS product prices have always irked me. I cannot deny the quality of their products though so it's hefty price I guess I will have to pay.

Oh oh oh...and just who does Smashbox think they are for selling their crappy eyeshadow primer for $20 for 0.08oz.? Riding the hype of their famous Photo Finish Foundation Primer I'm sure...they can kiss my lipstick!

Packaging
The NARS Smudge Proof Eyeshadow Base comes in a no fuss basic tube with a doe foot applicator (similar to Urban Decay Primer Potion). There are no fancy grooves and curves here, so we are sure to get the most of our product without sawing into the container (eh em Urban Decay!).

The thing that struck me as odd was that the container top (that holds the applicator) is as long as the actual container (tube). Hmmm...but I figured out a probable reason for this...that I didn't really notice as a deficiency in the Urban Decay Primer Potion until now. Because the top is so long you can use the applicator like an eyeshadow brush. It's much more comfortable and sturdier than a stubby cap.


Product
The product itself is medium thick with a creamy consistency. It comes out white but blends out to colorless on the eyelid. There is no color tint so it works well without affecting the eyeshadow color. It's not as thick as Urban Decay or as thin as Too Faced....a happy medium. It blends easily and leaves almost a silicone-based finish on the skin.

Performance
Now how does it measure up?

I have used Urban Decay and Too Faced for the longest time and both have their issues but I could never complain about performance. They both prevent creasing and my eyeshadow lasts all day. Along comes NARS...

The NARS Smudge Proof Eyeshadow Base does the same thing as the other primers....no creasing and long lasting eyeshadow. As far as eyeshadow color vibrancy goes...I use cream bases for that and they do a far better job. I rely on my primer to keep my oily lids under control and prevent creasing and fading. This does just that, no problem.

But...it outshines the other primers when used with a cream base...I have used it with my MAC Paintpots or MUFE Aqua Creams on top and excuse me! This helps them glide on like a dream. Again I didn't notice that this was an issue before, just par for the course. I thought that a little tugging and drying was a side effect of the MAC Paintpots (MUFE Aqua Creams are creamy on their own). But not so with the NARS Smudge Proof Eyeshadow Base. Everything glides onto my eyelid so easily, no dragging! I told you about the silicone-based finish! Smooth, silky and perfect.

Now my lids can be super oily or dry on any given day. For oily lids the NARS Smudge Proof Eyeshadow Base is great. But when there are dry spots watch out. The primer will emphasize the dry areas and not be as smooth. Make sure to moisturize dry spots before applying the primer to reduce these effects.

Overall

I'm enjoying the NARS Smudge Proof Eyeshadow Base right now more so than my Urban Decay Primer Potion. On dry days I have to make sure I moisturize well before using the primer but on oily days it's a dream. I prefer it when using MAC Paintpots as base because it helps with smooth application. I will still alternate between primers though because the price tag irks me! I will repurchase but not without cringing (hopefully I catch a sale).

If you can stand the price it's worth checking out!

Jun 9, 2010

'Blue Skies and Grassy Fields' Look

'Blue Skies and Grassy Fields' Look

As I was driving home yesterday I was staring at a beautiful stretch of green landscape against blue skies. That is what inspired this look.


Eyes:

PRIME:
I started off with NARS Smudge Proof Eyeshadow Base all over my lid up to the brow bone. I also applied MAC Layin' Low Paintpot (matte creamy beige) all over my lid up to my brow bone as my primary base. As a secondary base I used MAC Otherworldly Paintpot (matte light blue) to my lid only.

COLOR:
On the inner tear duct I applied MAC Blanc Type Eyeshadow (matte ivory).
Next on the inner lid, I applied MAC Clear Sky Blue Pigment (matte robin's egg blue).
On the middle of the lid I applied MAC Clarity Eyeshadow (matte vivid blue).
For the outer lid and crease I used Inglot #58 Eyeshadow (matte grassy green).
On the brow bone and for the blending I used MAC Silly Goose Eyeshadow (matte light green).
For highlight I used MAC Vanilla Eyeshadow (matte ivory).

BROWS:
My brows are filled in with MAC Eyebrow Pencil in Stud.

DEFINE:
I lined my upper lashline with Inglot #83 Gel Eyeliner (matte blue purple).
I lined my lower waterline with Loreal HIP Cream Eyeliner in Black.

I lined my outer lower lashline with Inglot #58 Eyeshadow (matte grassy green) and inner lower lashline with Inglot #60 Eyeshadow (matte yellow).
I used Covergirl Lashblast Mascara for my lashes and added Beautee Sense Demi Pixie Lashes for effect.


Lips:

POLISH:
I used NARS Honolulu Honey Lipstick and YSL  #48 Gloss Pur.


Face:

FINISH:
I used NARS Sheer Glow Foundation in Tahoe with MUFE Full Cover Concealer in #12 under my eyes. I set with MAC Blot Powder in Dark.
I used MAC Ripe Peach Blush Ombre for my cheeks.


Jun 8, 2010

Jun 7, 2010

'Ocean Sunset' Look

'Ocean Sunset' Look 

This is a look for Kiran as requested using yellow, orange, red and blue. It reminds me of a sunset on the ocean.


Eyes:

PRIME:
I started off with Urban Decay Primer Potion all over my lid up to the brow bone. I also applied MAC Layin' Low Paintpot (matte creamy beige) all over my lid up to my brow bone as my primary base.

COLOR:
On the inner lid I applied Sugarpill Buttercupcake Eyeshadow (matte yellow).
Next on the lid, I applied Sugarpill Flamepoint Eyeshadow (matte orange).
On the outer lid and crease I applied Sugarpill Love+ Eyeshadow (matte red).
For the outer V to add some depth I used Sugarpill Poison Plum Eyeshadow (matte purple).
For the blending I used Smashbox Nude Eyeshadow (matte nude).
For highlight I used MAC Ricepaper Eyeshadow (shimmery champagne).

BROWS:
My brows are filled in with MAC Eyebrow Pencil in Stud.

DEFINE:
I lined my upper lashline with Stila Stay All Day Eyeliner in Black.
I lined my waterline with and lower lashline with MAC Chromaline Pencil in Hi Def Cyan (matte vivid blue).
I used Covergirl Lashblast Mascara for my lashes and added Beautee Sense Smashing Lashes for effect.


Lips:

POLISH:
OCC Lip Tar in Melange with clear lipgloss.


Face:

FINISH:
I used MUFE HD Foundation in #173 with MUFE Full Cover Concealer in #12 under my eyes. I set with MAC Blot Powder in Dark. I used MAC Blush Ombre in Ripe Peach for my cheeks.

Thank You!!!!!!! Thank You!!!!!!! Thank You!!!!!!!


Thank You!!!!!!! Thank You!!!!!!! Thank You!!!!!!!


HEY GUYS!!!! Our little community has grown to 300+!!! Yipppeeee! That's exciting news for me (and I hope for you guys too).

I started this blog as a means to catalog my makeup looks and to track my technique. I never knew it would grow to include so many friends who share my love my makeup.

I wanted to thank you guys from the bottom of my heart for all the great support and feedback I have received over the past few months. I really appreciate it! It's like my own little slice of the makeup world and I am so happy you guys are a part of it. Thanks so much again! It's greatly appreciated!!!


Jun 4, 2010

'Turquoise Sugar' Look

'Turquoise Sugar' Look

I have been having a lot of no makeup days which was a pleasant break but...I had to get back to my normal ways. It has been a great week. How are you guys doing? Big weekend plans?


Eyes:

PRIME:
I started off with Urban Decay Primer Potion all over my lid up to the brow bone. I also applied MAC Layin' Low Paintpot (matte creamy beige) all over my lid up to my brow bone as my primary base.

COLOR:
On the inner lid I applied MAC Pure White Pigment (matte white).
Next on the lid, I applied Inglot #372 Eyeshadow (matte turquoise green).
On the outer lid and crease I applied Sugarpill Royal Sugar Loose Eyeshadow (matte vivid blue with sparkles).
For the inner crease I used Inglot #60 Eyeshadow (matte bright yellow).
For the blending I used Smashbox Nude Eyeshadow (matte nude).
For highlight I used MAC Ricepaper Eyeshadow (shimmery champagne).

BROWS:
My brows are filled in with MAC Eyebrow Pencil in Stud.

DEFINE:
I lined my upper lashline with Stila Stay All Day Eyeliner in Black.
I lined my waterline with Inglot #87 Gel Eyeliner (matte teal) and my lower lashline with Inglot #82 Gel Eyeliner (matte purple).
I used Covergirl Lashblast Mascara for my lashes and added Beautee Sense Smashing Lashes for effect.
 
Lips:

POLISH:
MAC Blooming Lovely Lipstick and MAC Lavender Wind Lipglass.


Face:

FINISH:
I used NARS Sheer Glow Foundation in Tahoe with MUFE Full Cover Concealer in #12 under my eyes. I set with MAC Blot Powder in Dark. I used MAC Gingerly Blush for my cheeks.

'Pencil Skirt with Ruffles' - Work Outfit

'Pencil Skirt with Ruffles' - Work Outfit

This is a simple work outfit for a warm day. I'm wearing a cropped champagne top with ruffles paired with a black pencil skirt and black open toe stilettos from Guess.

Jun 3, 2010

Stila Stay All Day Waterproof Liquid Eye Liner - Thoughts...

Stila Stay All Day Waterproof Liquid Eye Liner - Thoughts...


From Stila...

Finally a waterproof liquid liner that glides on with ease, won't smudge or run, and stays in place until you say when! The thin marker-like tip is easy to use even for the least experienced, and delivers a defined thin line to a dramatic bold line with precision. Goes on smoothly without skipping, smudging, or pulling, and lasts all day!
 size: 0.016 oz
PRICE: $20.00

Do not sleep on Stila lovelies!

I hated the MAC Penultimate Liquid Liner and other high-end/drugstore liquid liners that sport a felt tip (names withheld). The felt tip always hurts my eyelids and scratches at my delicate skin. Also, the product dries up really quickly and doesn't flow as well as I would like.

But no more! Welcome Stila Stay All Day Waterproof Liquid Eye Liner.

I bought this at the NYC Makeup Show after trying it out at the Stila booth. I must say I was skeptical because of my previous experience with felt tipped liquid eyeliners.

My Experience...

I love this liner! It applies in a continuous flow with being too runny and the tip doesn't dry up like other similar products I have tried. The tip allows for a super thin line to a medium thick line depending on your taste. The liner itself is a nice black and it leaves a semi-shiny finish which is a nice touch. And guess what? It's waterproof, smudge-proof, budge-proof...and my nap and shower test proved it. It is a bit pricey for the amount of product but I guess I will have to bite the bullet and repurchase this one.

TIP: It has a lightweight formula that I have found useful for coating the back of my lashes and covering eyeshadow fallout.

NOTE: If you swatch this on the back of your hand it will bleed onto the lines on your skin but keep in mind this is not truly representative of the skin on your eye. I haven't had any issues with the liner bleeding or running on my eyes.

Swatched on the back of my hand


On the upper lashline...see the shiny finish?

MAC Nude Story Collection - Pigments

MAC Nude Story Collection - Pigments


From MAC:

The Artist's fascination for the skin tone explored through this new collection of Chromagraphic Pencils, Pro Longlash, Lip Erase and Pigment. Real to surreal. Make your art barely something or nakedly nothing...but show some skin.

This collection was released recently (May 2010) on the MAC PRO website and in MAC PRO stores only. The collection includes the skintone Chromagraphic Pencils, Pro Longlash Mascara in Barelash, skintone Lip Erases and three skintone Pigments.

Since I'm a pigment lover I had to have the new pigments that came out with this collection and I already own Naked Pigment which is permanent (for now). So I got...

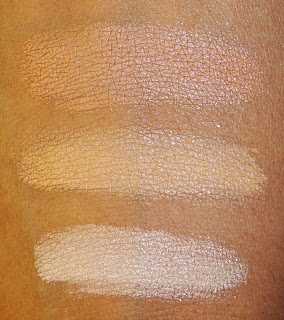
L-R - Naked, Naked Dark, Naked Deep Dark

Naked - Shade description: Fleshy beige with pearl
I find that this is more of a pinky beige with pearl.

Naked Dark - Shade description: Medium beige with pearl
For me this is a caramel or yellow based nude with pearl.

Naked Deep Dark - Shade description: Dark beige with pearl
This comes off as a cocoa nude with pearl.

These pigments are great for neutral eye looks as well as for use as a blush, contour or highlight for the face. Remember also that you can add pigments to and liquid, i.e. foundation, lotion, moisturizer, etc.. for added shimmer or sparkle. These would be great for an added summer glow to your foundation. And not to worry, these can work on most of not all skintones...just for different purposes.

L-R - Naked, Naked Dark, Naked Deep Dark

L-R - Naked, Naked Dark, Naked Deep Dark


Bottom to Top - Naked, Naked Dark, Naked Deep Dark

Jun 1, 2010

MAC Haute & Naughty Lash Mascara

MAC Haute & Naughty Lash Mascara

Do you guys remember when I was testing a mascara for a consumer testing company back in March? Well when I returned the mascara I was told it was a future MAC Mascara. I didn't want to tell you guys and it ended up being scrapped but now....it's official! The mascara I tested is the upcoming MAC Haute & Naughty Lash Mascara.

U.S. Launch Date: September 2010


For once I have the 411 on a MAC debut!

So here's how it works....the brush can be used two ways. First way is to pull off just the pink cap off the tube...the brush will be pulled through a small tube extension on the purple/glitter cap and you will get less product. This can be for separating and lengthening the lashes.

The second way is to pull off both the pink and purple/glitter caps together so the brush is just pulled through the bottle itself like a normal mascara. You get a fuller brush with more product so you can get volume.

I got volume and length and it made my lashes super thick and black. It was the perfect mascara for me! It was actually a GREAT mascara and I HATED that I had to give it back after four weeks! I will be BUYING THIS FOR SURE!!!
>