Jul 9, 2010

MAC Haute & Naughty Lash Mascara - Photos and Thoughts...

MAC Haute & Naughty Lash Mascara - Photos and Thoughts...


The MAC Haute and Naughty Lash Mascara has debuted on both the MAC and MAC Pro websites as well as Nordstrom's website. The mascara won't be available in store until August for Nordstrom and September for the MAC locations.


I had already tested this mascara through a Consumer Evaluation Center - just a company that does consumer testing and provides feedback to the companies through questionnaires. We had no clue what the mascara was until the end of the study. When I learned it was a future MAC mascara I was super excited because I HAD TO HAVE IT!

From MAC...
A two-in-one mascara that lets you choose if you want lashes to be naturally defined, or instantly combed and loaded for full-on drama. Easy to use dual-wiper system allows this lightweight formula to go on either way. One wiper refines the application for a clean sweep, while the other loads the lashes for greater impact.

9.0 g / 0.31 US oz
US $18.00
Available in Haute & Naughty Black

My Four Ps -
 
Price
As you may notice, it's MAC's most expensive mascara at $18. MAC mascara usually range from $13-$14 in price with about 8g/9g of product. So you seem to be paying a $4 more for the specialized packaging. Other high end brands are pricier - MUFE Smokey Lash is $22 for 0.23oz, Dior Diorshow is $24 for 0.38oz. MAC Haute and Naughty Lash Mascara falls in the range of Too Faced Lash Injection which is $19.50 for 0.45oz and Urban Decay Big Fatty Mascara which is $20 for 0.65oz.

I'm not mad at MAC at all for this higher price simply because it's worth it this time around.


Packaging
This is the most intriguing part of the MAC Haute and Naughty Lash Mascara. In fact it makes the mascara what it is. So the mascara tube comes with two caps - pink and purple. When you remove the first cap (pink) the mascara brush will be pulled through the tube extension of the second cap (purple). This will remove most of the product and leave you with a clean brush for separating and lengthening lashes. When you remove the second cap (purple) which by default removes the first cap too, you pull the brush through the mascara tube as with a regular mascara. This way you get full on product and volume to your lashes. this works very well when used properly.

A picture is worth a thousand words so here are some pics...


Product
The product itself is full on black. One of the blackest mascaras I have run into and I love that. No greyish tinge here. It's great for volume and length without weighing lashes down.

Performance
The real test is how this mascara measures up. As I mentioned I tested this mascara before and using it now I am still very happy. The second cap builds volume like no other but warning it can be a bit clumpy. The product does what it says though and adds drama to the lashes. Intense drama! Do not use if you want a natural look at all.

TIP 1: Use the second cap first for volume THEN use the first cap to separate lashes and remove clumps while providing length. If you do the reverse I promise there will be clumping.

TIP 2: When you remove the second cap brush there will also be some excess product on the tip that requires wiping off of the sides of the tube to avoid wastage and a big mess.

TIP 3: Allow time for the mascara to dry. it doesn't dry as quickly as other mascaras do.


WITHOUT MASCARA

WITH MAC HAUTE & NAUGHTY LASH - PINK SIDE

WITH MAC HAUTE & NAUGHTY LASH - PURPLE SIDE


Overall
I'm all over this mascara! But keep the tips in mind to avoid any issues with the mascara. the key is to use the mascara properly. Don't blame the product but rather the application process which takes some adjusting to.
This is now my holy grail in mascara. Definitely recommend (with TIPS of course!)

Jul 8, 2010

Cool Blue Summer Look Tutorial

I Went OVERBOARD Haul....

I Went OVERBOARD Haul....

OMG!!! I really really didn't mean to....I swear!

As you may know, there are three new MAC collections out right now for July (oh and one upcoming one at the end of the month) - In The Groove, Haute and Naughty and Alice and Olivia.


Of course I had to get the Haute and Naughty Lash Mascara...because I loved it when I tested it!

And then oh la la la...Alice and Olivia brought me some super nice pigments.

And the kicker was In The Groove (which I have been calling In The Grove - silly me). I got almost everything. The mineralize eyeshadows are so much softer and more pigmented than in past collections. And they are more of a satin finish rather than frosty. If you are tan at all (NC30/NW35 or darker) then these eyeshadow colors will look fab on you skin.

I'll do full reviews and swatches coming up!

'Cool Blue Summer' Look

'Cool Blue Summer' Look

So it's ridiculously hot and I seem to have sprained my ankle from ust walking and I'm having a terrible allergic reaction to the stupid hair dye and I'm running out to get my Stereo Rose MSF and so on....LOL! These are my excuses for a less than creative post title. And as much I hate to admit it, it seems I got a bit of a tan....


Eyes:

PRIME:
I started off with NARS Smudge Proof Eyeshadow Base all over my lid up to the brow bone. I also applied MAC Layin Low Paintpot (matte creamy beige) all over my lid up to my brow bone as my primary base.

COLOR:
On the inner lid I applied MAC Blanc Type Eyeshadow (matte ivory).

For the middle of the lid I applied MAC Cool Pink Pigment (matte pale pink).
On the outer lid I applied Inglot #388 Eyeshadow (matte purple).
To define the crease I used MAC Blue Cyan Pigment (matte cyan blue).
I used Smashbox Nude Eyeshadow (matte nude) for blending.
For highlight I used MAC Ricepaper Eyeshadow (shimmery champagne).

BROWS:
My brows are filled in with MAC Eyebrow Pencil in Spiked.

DEFINE:
I lined my upper lashline with Wet 'n' Wild Gel Eyeliner in Black.
I lined my lower waterline with Inglot #88 Gel Eyeliner (matte deep purple).
I used MAC Blanc Type Eyeshadow (matte ivory) on my lower lashline and inner tear duct area.
Then I applied Inglot #388 Eyeshadow (matte purple) to my outer lower lashline.
I used MAC Studio Fix Lash Mascara for my lashes and added Beautee Senses Demi Pixie Lashes for effect.


Lips:

POLISH:
For my lips I used OCC Mememto Lip Tar topped with MAC Cultured Lipglass.


Face:

FINISH:
I prepped my skin with MAC Oil Control Lotion. I used MUFE Velvet Mat + Foundation with MUFE Full Cover Concealer in #12 under my eyes. I set with MAC Blot Powder in Dark. I used MAC Tippy Blush for my cheeks.

Jul 7, 2010

'Soft Summer Glow' Look

'Soft Summer Glow' Look

This look is a simple summery look with a op of pink. This would be great for a summer wedding or for an everyday neutral look with a kick. The pink can always be substituted for another color while maintaining the neutral effect. Don't mind the pics too much...it's hot and I'm sweaty..ick!


Eyes:

PRIME:
I started off with NARS Smudge Proof Eyeshadow Base all over my lid up to the brow bone. I also applied MAC Layin Low Paintpot (matte creamy beige) all over my lid up to my brow bone as my primary base.

COLOR:
For the lid I applied MAC Ricepaper Eyeshadow (shimmery champagne).
On the outer lid I applied MAC Lala Eyeshadow (satin pink).
To define the crease I used MAC Cross Cultural Eyeshadow (matte dark brown).
I used Smashbox Nude Eyeshadow (matte nude) for blending.
For highlight I used MAC Blanc Type Eyeshadow (matte ivory).

BROWS:
My brows are filled in with MAC Eyebrow Pencil in Stud.

DEFINE:
I lined my upper lashline with Wet 'n' Wild Gel Eyeliner in Black.
I lined my lower waterline with Loreal HIP Cream Eyeliner in Black.
I used  MAC Ricepaper Eyeshadow (shimmery champagne) on my lower lashline and inner tear duct area.
Then I applied MAC Lala Eyeshadow (satin pink) to my outer lower lashline.
I used MAC Opulash Mascara for my lashes and added Beautee Senses Smashing Lashes for effect.

Lips:

POLISH:
For my lips I used MAC Blooming Lovely Lipstick topped with MAC Lavender Wind Lipglass.


Face:

FINISH:
I prepped my skin with MAC Oil Control Lotion. I used MAC Studio Fix Fluid Foundation in NC45 with MUFE Full Cover Concealer in #12 under my eyes. I set with MAC Blot Powder in Dark. I used MAC Azalea Blossom Blush Ombre for my cheeks topped with MAC Comfort Mineralized Skinfinish.

Naked Cosmetics - THOUGHTS....

Naked Cosmetics - THOUGHTS....

From Naked Cosmetics website...

Naked Cosmetics is the purest, most natural line of Cosmetics that exists! The Color Collections are 100% oxidized mica...a mineral. Contains no talc, oils, waxes or other fillers. 100% color! The colors can be used as Eye Shadow, Eyeliner, Lipstick, Blush, Bronzer, Hair highligher...and much much more. NO ANIMAL TESTING. No Parabens added.

Kudos to Naked Comestics for being cruelty-free and all....other than that I say FAIL! This is not a peaceful post so be warned!

I have mentioned before that I picked up one of the pigment stacks at the NYC Makeup Show, the Shock Effect Stack to be precise. I have even used one of the colors in a tutorial and did a test drive on the rest. At the end of the day, what a waste of money...even if I bought it at a 50% discount.


My Four P's...

Price
The price is my biggest gripe with Naked Cosmetics. The pigment stacks retail for $59.99 for 6 colors while the single pigments retail for $15. Of course the pigment stacks are the more reasonable deal but you are stuck with the 6 preordained colors in the collection. Now that equates to roughly $10 per color at the cheapest (if you buy the pigment stacks).

Sounds like a deal right? WRONG! Coincidentally (on purpose??) the website doesn't have the net weight or the amount of product posted or readily available for shoppers.

Bottom line - you get 0.05oz/1.5g for $10 with the stacks or $15 if you buy singles.

MAC Pigments are $19.50 for 0.15oz/4.5g. And these are the smaller pigments sizes!!! So for $4.50 more you can get 3 times the amount of much better quality pigments.

Make up For Ever Star Powders are $19 for 0.9oz. Again almost twice as much for $4 more. And MUFE has much better quality.

Even Sugarpill Loose Eyeshadows which the Naked pigments are more comparable to are $12 for 5g.

Packaging
So with the price being what it is, you would think the packaging would be on the up and up right? WRONG again! The containers are simple plastic bulky screw top jars that you can get at any craft store. They don't even have the decency to add a sifter to the jars. You open the top and dip right into the pigments. The pigments are stackable so that's a plus.

And don't get me started with the labels! The product information is stuck onto the bottom of each jar using cheap round paper printer labels. Don't make the mistake of getting these wet or even leaving them idle. Two of mine already peeled off in my makeup drawer.


Product
With all that being said, the product must be outstanding to warrant the price by now right? WRONG! The product itself is just run of the mill, chunky, frosty pigment. Nothing stellar about them. They are not on par with MAC or MUFE for sure or even my trusty Sugarpill. In fact they remind me of Pure Luxe pigments which you can get for $1 for 1/8 tsp. each.

They swatch decently we or dry but only by layering and layering the color. I was willing to give them a chance once I used them because they aren't that awful but then....I had flaking in a couple of hours!

They have really pretty colors and I wanted so much to like them.

 
Performance
Need I say more? They swatch nicely and apply decently but flaked in a couple of hours for me. I tried all the colors in the stack so I know it wasn't just one bad egg. And the price and packaging kill any hope they ever had with me.
 
Swatched DRY over primer........Swatched WET over primer


Swatched DRY over primer........Swatched WET over primer


OVERALL
EPIC FAIL! Only buy if you want to waste your money. At the end of the day Naked Cosmetics is just another mineral line that can easily be duped for cheaper comparable and even better quality products.
 
Why the heck are Naked Cosmetics pigments more expensive than MAC or MUFE??? Who the hell do they think they are??? Shame on you Naked!!! REALLY???!!!
 
End of bash fest....can you tell I'm still upset??


Jul 6, 2010

Sun and Summer Makeup

Sun and Summer Makeup

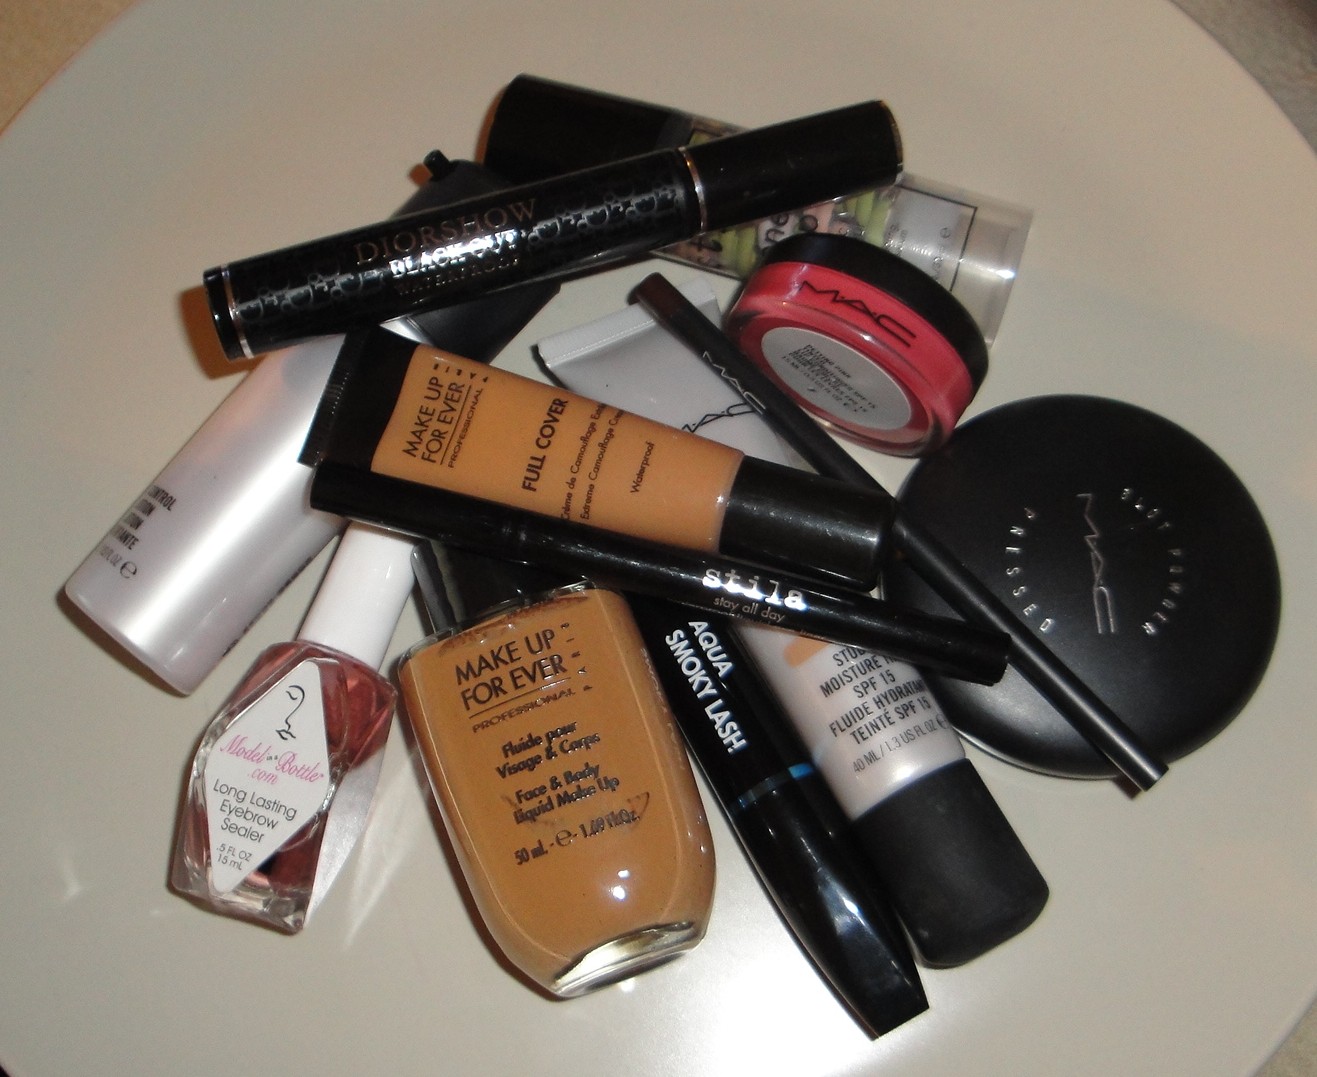
I'm back from vacation and I thought this post may be helpful for some who are seeking out the best way to summer-proof their makeup for vacation or hot summer days.

The summer months bring with them heat, humidity, pools, beaches, sun showers and the occasional thunderstorm. There are some key elements to remember and seek out for summer makeup - waterproof/water-resistant, SPF and lightweight!


  • Use Sunscreen! There are no two ways about it, everyone should wear sunscreen year round but more so in the summer. I suggest using a great moisturizer/primer with sunscreen for days in the sun. Don't rely solely on the limited SPF of your foundation to do the job. I use MUFE UV Prime SPF 50/PA +++.
  • For Foundation I recommend scaling back the coverage to allow your skin to breathe and to avoid the dreaded makeup meltdown. The more layers you wear and the higher the coverage then the more prone your makeup will be to 'melting' during the day. I suggest using a tinted moisturizer such as Stila Tinted Moisturizer or a lightweight foundation such as MUFE Face and Body Foundation. These offer light coverage and in some cases SPF. The MUFE Face and Body Foundation has the added bonus of being waterproof so feel free to enjoy water activities! 
  • My concealer is also waterproof. I use MUFE Full Cover Concealer.
  • I also keep my MAC Blot Powder handy for touch-ups and to blot oiliness during the day.


  • My eyeliner is also waterproof. I use Stila Stay All Day Liquid Eyeliner. For my waterline I opt for MUFE Aqua Liners or Urban Decay 24/7 Eyeliners which are also waterproof.
  • Mascara of course should be waterproof. I use MUFE Aqua Smoky Lash Mascara or Dior Diorshow Blackout Waterproof Mascara.
  • For my eyebrows I still use my regular eyebrow pencil but I set everything with Model In A Bottle Eyebrow Sealer which makes it waterproof and smudge-proof.
  • Don't forget your lips! lips are prone to getting burnt or chapped in the harsh sun so use a lip balm with SPF for added moisture and sun protection.

  • For extended makeup wear I will also use a makeup setting spray. In this case Urban Decay Oil Control Setting Spray.
  • Now since everything is waterproof guess what??? Yep1 You will need a waterproof makeup remover. I suggest a gentle remover (oil based if you have dry skin and water based if you have oily skin). I use MUFE Sens'Eyes Eye Makeup Remover to remove my waterproof eye makeup.


I'M BACK!...and vacation pics...

Hi guys!!! It's so great to be back but I do miss Hawaii though...
I had an awesome time with my fantastic bf...although he hogs the bed. : )

I have a lot of catching up to do so please bear with me and the upcoming posts. I hope to incorporate your requests (both new and old) as well as throw some video tutorials in the mix. Also, I'm awaiting my precious Alice and Olivia and In The Groove and Haute and Naughty purchases so stay tuned for swatches and reviews.

Jul 2, 2010

On Vacation in....HAWAII

Hi Fancy Faces (hahahaaaa @ my new nickname for you beauties),

Just popping in quickly to let you guys know that I'm on vacation in Hawaii so there will be no posts for the rest of the week until Tuesday (July 6th)   : (

I miss you guys and I hope you have a Happy Independence Day - July 4th!!!

Talk to you soon.

Love
Tina!

P.S. Tell me what you want to see in future posts so I can work on it.... : )
>