Also...
Showing posts with label Beginners. Show all posts
Showing posts with label Beginners. Show all posts
Oct 16, 2010


Oct 9, 2010
Tips for Beginners - EYESHADOW PLACEMENT AND APPLICATION (EYE DIAGRAM)
Tips for Beginners - EYESHADOW PLACEMENT AND APPLICATION (EYE DIAGRAM)
When starting out with eyeshadow it's very important to understand the layout of the eye. Knowing this basic information will be helpful for applying eyeshadow and understanding the different effects that can be accomplished just by using different colors and textures on different parts of the eye. Eyeshadow application is all about creating an illusion by using different shades and textures to achieve certain effects. So let's get right into the different parts of the eye and some basic effects that can be created by using different techniques.
PARTS OF THE EYE
First off, I visually divide my lid into 3 vertical segments - INNER, MIDDLE and OUTER - which is simple enough figure out. The INNER portion is closest to my nose, the MIDDLE portion is of course in the center and the OUTER portion is closest to my ear.
Next I I find my CREASE. You can do this by feeling along the eye for the eye socket or the bone right above your eyeball. The crease falls right along that bone. Some people have well defined creases meaning the eyelid actually creases in that area while some may have to feel around for a crease.

Now that we have the basic areas of the eye mapped out let's get more specific.


LID
The LID is the area right below your CREASE. The amount of space will vary from person to person. Now what you place on the LID will be your choice. You may go for a single color, or numerous colors. The typical eyeshadow application with 3 colors will call for the lightest shade on the INNER LID, the medium shade on the MIDDLE of the LID and the darkest hue on the OUTER LID. This gives the eye an elongated dimensional effect.
Another effect is going with a shimmery shade on the MIDDLE LID and deeper shades on the INNER and OUTER LID areas. This will give a more wide eyed illusion to the eye by bringing the focus to the center on the lid.
CREASE
The CREASE is probably the trickiest area of the eye to contend with. As stated before the CREASE falls right along the socket bone of your eye right above your eyeball. Yes I know it sounds a little bit clinical but that's the best way I could describe it. : )I think of the CREASE as the middle of my eyelid if I visually divide my eye into 3 sections horizontally. The crease area can be as thick as you choose. It may even encompass the browbone area depending on the desired effect. For instance, in many cut-crease looks crease color extends high onto the browbone area. For a subtle look the crease color is concentrated in a tight area.
For simple looks the crease color is usually concentrated in the outer area and gradually fades as you get closer to the inner part of the eye. The color also tends to be a darker color than the lid color to add dimension to the look.
For this area a matte or semi-matte shade will add depth to the crease while a frost or shimmery shade will reflect light. The CREASE color is usually darker and coordinates with the color(s) on your LID. Your choice in color and texture will vary based on the desired effect.
BROWBONE
The BROWBONE area is just what it sounds like. It's the space between the crease and the eyebrow and falls right on the bone below your eyebrow. The width of the BROWBONE area varies from person to person and even eye to eye. Some eyes have a lot of browbone space but limited lid space. This can be evened out by the use of eyeshadow to create the illusion of a larger lid and a smaller browbone area. In this case the crease color would need to be higher than the natural crease of the eye.
For those with limited browbone space the crease color should be concentrated in a tight area to give the illusion of more space between the crease and the highlight area.
Consider the BROWBONE space as your blending area. This is where the crease color should gradually fade into the highlight color. In other words, this area is used to create a gradient of color from crease to highlight. It's easiest to use a neutral color that is close to your skin tone here to help blend out harsh lines and produce a seamless blend. You may also use a lighter color than the CREASE color to achieve a similar effect.
OUTER V
The OUTER V is also a tricky area for a lot of beginners. It is the outermost corner of your eye furthest away from your nose. It's called the OUTER V because it is most often shaped like a sideways 'V' as shown in the picture above. But it can also be rounded out and shaped like a 'C' instead for a softer look.A darker color (or black) is usually placed in the OUTER V to create a contour effect and add dimension to the look. A darker OUTER V adds the illusion of a more sunken crease area.
A trick I found to locating your OUTER V is to feel along the outer edge of your eye along your eyeball. The OUTER V will be like an outline on the outer edges of the eyeball.
For this area it's best to use a matte or semi-matte shade since you want to create a shadow/contour effect. Shimmery shades will reflect light and therefore not create a 'deepening' effect.
HIGHLIGHT
The HIGHLIGHT area is perfectly named since it is the HIGHest point of the eye just below the eyebrow. A light color is usually placed on this area to accentuate and lift the eye.A light shimmery shade is usually used on this area and the color should complement the other colors in the overall look. If the look is mostly shimmer then it's best to use a matte or semi-matte shade to contrast against the frosty textures.
UPPER LASHLINE
The UPPER LASHLINE is the area right along and above the top eyelashes. A darker color, in the form of a eyeliner pencil, gel eyeliner, or eyeshadow, is usually places along this area to accentuate the eyelashes and make them appear fuller.
LOWER LASHLINE
The LOWER LASHLINE is the area right along and below the bottom eyelashes. This area is usually used to enhance the eye with color or a smokey liner. It can also be left blank for a simple look.
TEARDUCT
The TEARDUCT is the inner most point of the eye closest to the nose. A light color can be applied in this area for a highlight. This will help to brighten the eye and add dimension to a look.
WATERLINE
The WATERLINE is the inner rim of your lashline - both top and bottom. The waterline is usually lined with a pencil or gel/cream eyeliner but powder can also be used (be mindful that powder may get into your eye).For the lower WATERLINE most people use black or a dark brown for a darker sultry look. However, for a fresh, brightening effect you may use white or a flesh color. This can also make your eyes appear larger than they really are.
Lining the UPPER WATERLINE is called TIGHTLINING. This is done using a dark color (95% of the time it's black) and will make the top lashes appear much fuller and thicker. This is not the most comfortable thing so be prepared to blink and get teary unless your eyes are not that sensitive to probing.
Oct 1, 2010
Tips For Beginners...EYESHADOW FINISHES & TEXTURES
Tips For Beginners...EYESHADOW FINISHES & TEXTURES
One key thing to fully understand when beginning to work with eyeshadows are the finishes that are associated with them. Each eyeshadow finish will produce a different effect on the eyes and the overall look.
When I just started out with eyeshadows my head went spinning with the different finishes. I wasn't quite sure what the finish descriptions really meant until after working with eyeshadows for a while. The end result and techniques can really differ depending on the eyeshadow finish.
Hopefully this quick guide can help shine some light for beginners and even for novices (such as myself) out there.

What do I mean by eyeshadow finish?
The eyeshadow finish basically describes the texture and appearance of an eyeshadow. The eyeshadow finish will affect the color payoff, ease of use and overall result of the final look. This can apply to all forms of eyeshadow be it pressed, liquid, cream or loose. See previous post here - LINK.
EYE SHADOW FINISHES
The easiest way to tackle eyeshadow finishes is to start with one of the most popular makeup companies in the world - MAC. MAC can be anointed the king of eyeshadow finishes so let's use their descriptions as our guideline. Definitions can be found here: M.A.C.
MATTE (M) - Hi-colour pay-off in a no-shine matte finish.
Matte eyeshadows are just as described - no shine, no glitter, no frost. These produce a flat, almost air-brushed finish. They do not reflect light and are very true to color. You will get the most intense color from a matte finish. Matte eyeshadows are notorious for being chalky (dry, powdery and patchy) but tend to work well with a good base and brush. A Matte finish is great for contouring and shading since it does not reflect light and can be used to produce a shadow effect. This is my favorite eyeshadow finish because of the intense color and airbrush effect. There are many great brands out there that offer fantastic matte eyeshadows but they can be tricky so it's best to test them out before you commit. Some mattes are extremely creamy and apply smoothly while others may have a drier texture and produce a patchy result. It all depends on the brand and how finely milled the powders are.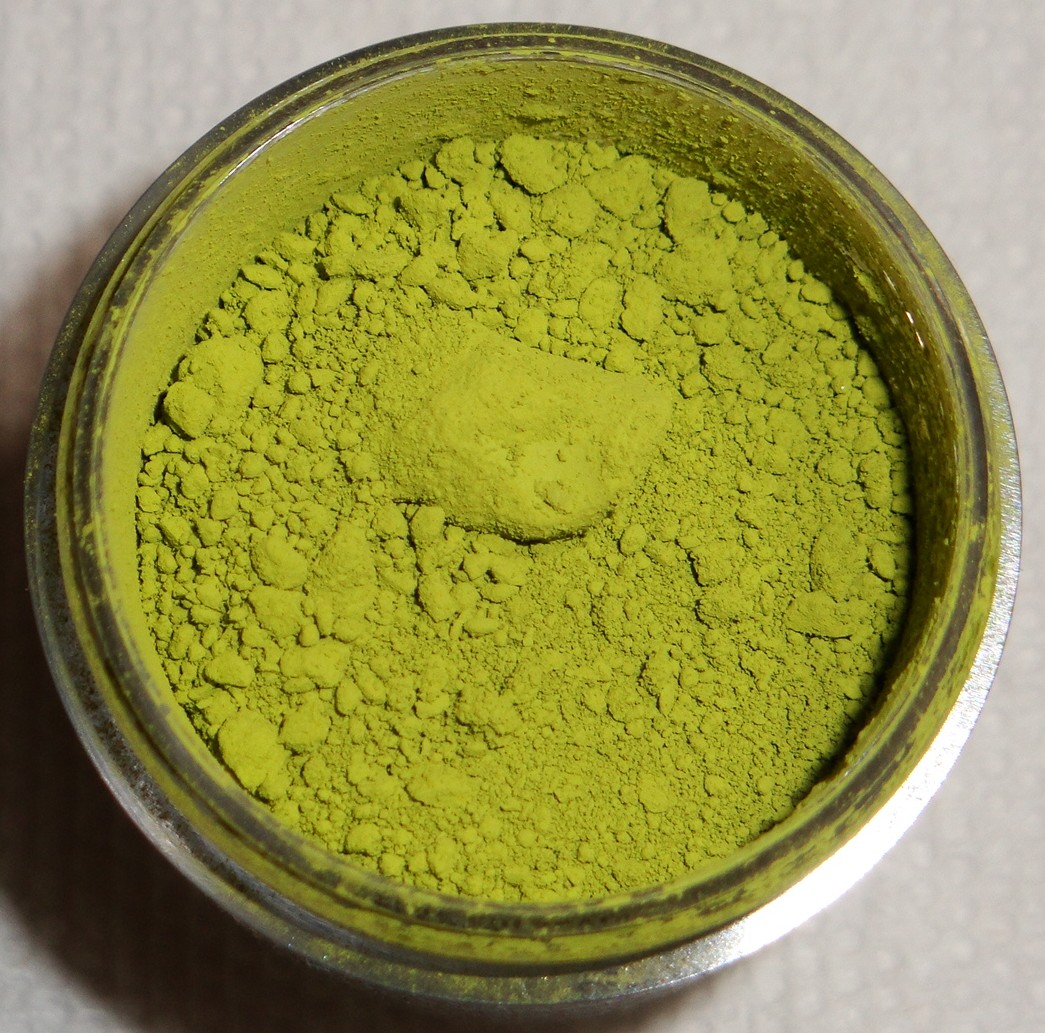

Mattes - MAC True Chartreuse Pigment, Inglot #388 e/s


Mattes - MUFE #9 e/s, MAC Wedge e/s

Mattes - MAC True Chartreuse Pigment, Inglot #388 e/s, MUFE #9 e/s, MAC Wedge e/s
********************************
MATTE2 - Intense, opaque matte finish with exceptionally rich colour payoff.
Matte2 eyeshadows are similar to the Matte finish and are really just an improvement on the MAC Matte finish. The powders are more finely milled and so apply more smoothly. These have the same qualities of a Matte eyeshadow but will feel a bit creamier. This finish name (not necessarily the texture) is unique to MAC and is not one you will see from other brands.
MATTE2 - MAC Newly Minted e/s, MAC Tete-a-Tint e/s, MAC Pen 'n' Pink e/s, MAC Copperplate e/s

MATTE2 - MAC Newly Minted e/s, MAC Copperplate e/s

MATTE2 - MAC Newly Minted e/s, MAC Tete-a-Tint e/s, MAC Pen 'n' Pink e/s, MAC Copperplate e/s
********************************
FROST (F) - An iridescent shine that adds a highlight to any colour.

Frosts - MAC Goldmine e/s, MAC Bronze e/s, MAC Crest The Wave e/s

Frosts - MAC Crest The Wave e/s

Frosts - MAC Goldmine e/s, MAC Bronze e/s, MAC Crest The Wave e/s
********************************
SATIN (S) - Pure colour in a satin-style finish. Provides a soft subtle non-frost, light-refractive sheen.
The Satin finish is true to its name and mimics the look of satin fabric. It produces a very soft subtle sheen rather than an intense frosty effect. This finish is becoming more and more popular across brands and is ideal because it's a happy medium between matte and frost. It can be used to highlight because of the sheen but is not overpowering like a Frost. It can also pack on great color but is not likely to be chalky like a Matte.
Satins - MAC Silly Goose e/s, MAC Girlie e/s, MAC Haunting e/s, MAC Mylar e/s


Satins - MAC Girlie e/s, MAC Haunting e/s

Satins - MAC Silly Goose e/s, MAC Girlie e/s, MAC Haunting e/s, MAC Mylar e/s
********************************
LUSTRE (L) - Smoothly pearlized; intensely frosted with deluxe ultra-fine "conditioned" finish.
The Lustre finish is similar to Frosts but with a sparkly effect rather than a pearlized finish. Lustres are not my fave because they can be flaky with chunky glitter. Lustre eyeshadows are the most shimmery of all the finishes and uses finely milled sparkles for the intense frost effect. This again is a finish name unique to MAC and is not used to describe eyeshadows from other brands.
Lustres - MAC Greensmoke, MAC Nanogold, MAC Sweet Lust

Lustre - MAC Sweet Lust

Lustres - MAC Greensmoke, MAC Nanogold, MAC Sweet Lust
********************************
VELUXE (VX) - Superfine pigment rich and very luxe. Supple to apply. Provides silky smooth matte finish.
Oh Veluxe! This is a super creamy version of a Matte that does not produce as much color intensity. Benefits are the same as Mattes but with less of a color punch and much smoother. Again unique to MAC.
Veluxe - MAC Samoa Silk e/s, MAC Silly Goose e/s, MAC Kid e/s

Veluxe - MAC Samoa Silk e/s

Veluxe - MAC Samoa Silk e/s, MAC Silly Goose e/s, MAC Kid e/s
********************************
VELUXE PEARL (VP) - Vibrantly-toned. Velvety soft. Shimmeringly metallic. Veluxe eye shadow, now overlaid with high-shine pearl.
The Veluxe Pearl finish is somewhat of a refined Frost. It has the benefits of the Veluxe finish since it's super soft and smooth (feels buttery) and produces a great pearlized effect like a Frost. The pearlized effect is more metallic than frosty for Veluxe Pearls and the colors are soft and shimmery. Again unique to MAC.
Veluxe Pearl - MAC Twinks e/s, MAC Birds & Berries e/s, MAC Star Violet e/s, MAC Shimmermoss e/s


Veluxe Pearl - MAC Star Violet e/s, MAC Shimmermoss e/s

Veluxe Pearl - MAC Twinks e/s, MAC Birds & Berries e/s, MAC Star Violet e/s, MAC Shimmermoss e/s
********************************
VELVET (V) - Soft look finish with high-colour intensity. Has a plush velvety look and feel.
The Velvet finish is very tricky. It can range from a matte to satin finish with subtle glitter to full on glitter bomb. The issue with these are the glitter that is infused within the eyeshadow - it may not adhere very well to the skin - and the color payoff which can be very patchy. This finish name (not necessarily the texture) is unique to MAC but other brands use the same concept with many of their eyeshadows - matte finish infused with glitter.

Velvets - MAC Climate Blue e/s, MAC Sketch e/s, MAC Cloudburst e/s

Velvet - MAC Climate Blue e/s

Velvets - MAC Climate Blue e/s, MAC Sketch e/s, MAC Cloudburst e/s
********************************
METALLIC - The Metallic finish is true to it's name. It has an intense metallic sheen when applied to the skin and closely resembles actual metal - think foil, silver, gold, copper, bronze. There are quite a few brands that carry a metallic finish including MAC, Illamasqua, DuWop and Make Up For Ever.

Metallics - MAC Silver Pigment, MAC Copper Pigment
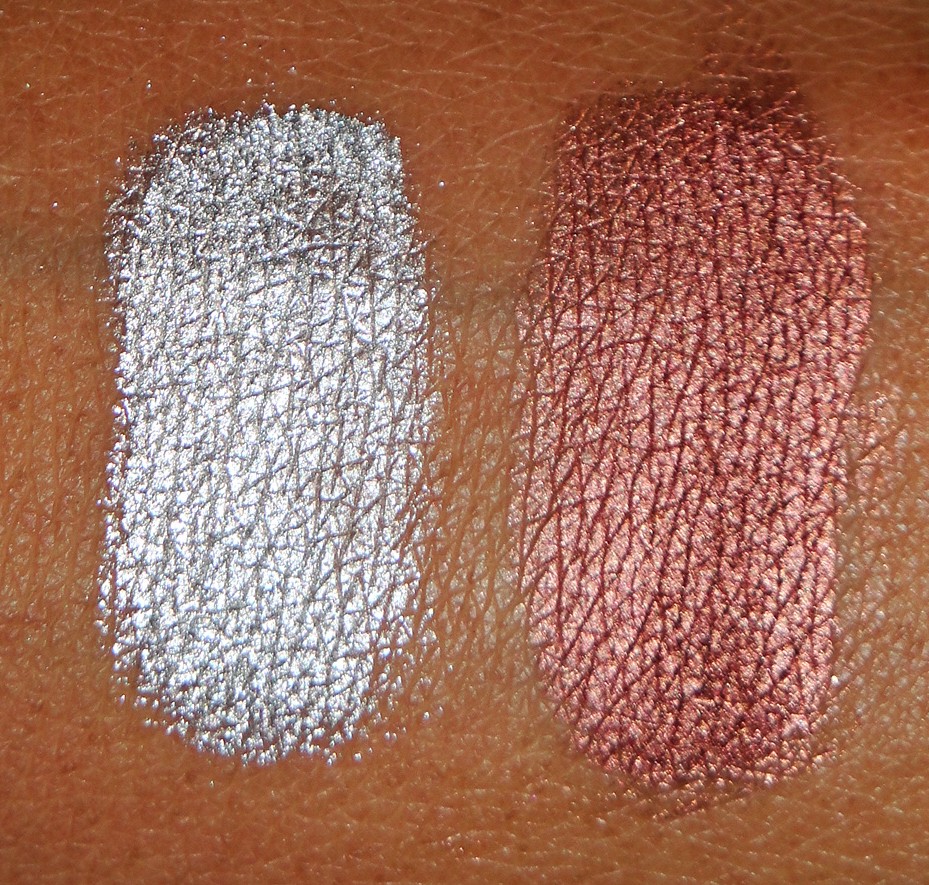
Metallics - MAC Silver Pigment, MAC Copper Pigment
********************************
STARFLASH - This finish is also unique to MAC and is produced as a Limited Edition eyeshadow finish. many people love these eyeshadows because they are super soft and silky and give great color intensity.They are a cross between Frosts and Veluxe Pearl and can give a high or even a metallic frost finish.
 Starflash - MAC Strike A Pose e/s, MAC Rated "R" e/s, MAC Smoke & Diamonds e/s, MAC Glamour Check e/s

Starflash - MAC Glamour Check e/s
 Starflash - MAC Strike A Pose e/s, MAC Rated "R" e/s, MAC Smoke & Diamonds e/s, MAC Glamour Check e/s
********************************


Starflash - MAC Glamour Check e/s

********************************
MINERALIZED/BAKED - The mineralized/baked finish can vary from semi-matte to satin to full blast frost. What is unique about the Mineralized finish is that it can be used both wet or dry without ruining the eyeshadow. These eyeshadows are baked and produce a soft effect when used dry but deliver intense color when used wet. There are mineralized/baked eyeshadows popping up across a few brands but not the majority.


********************************


MATTE with GLITTER/SPARKLES - This has become a very popular trend with many makeup companies. It's simply a Matte eyeshadow infused with glitter or sparkles. The glitter can be light to super intense but it is very likely to disappear (well fall off) once it is applied to the skin. I am not sure if the glitter was added to make the matte eyeshadow more attractive or if it was intended to be functional....either way the glitter/sparkle takes work to adhere to the skin.


Inglot #476 Double Sparkle Eyeshadow, Sugarpill Birthday Girl Loose Eyeshadow

Inglot #476 Double Sparkle Eyeshadow, Sugarpill Birthday Girl Loose Eyeshadow
Jul 15, 2010
TIPS for Beginners - CHOOSING FOUNDATION
TIPS for Beginners - CHOOSING FOUNDATION

Now that we have covered the basics of foundation and skin type and you are familiar with the terms, let's get right into Choosing Foundation.
Check out the Previous Posts: Tips for Beginners - SKIN TYPE
Tips for Beginners - SKIN CARE
Tips for Beginners - UNDERSTANDING FOUNDATION
Again I will say I am not expert when it comes to foundation so all I can do is pass on what I know and what I have learned.
How do you choose the right foundation?
There are a few basic things to consider when choosing your foundation as indicated below.
- Coverage
- Foundation Type
- Skin Type
- Foundation Finish
- Color and Undertone
C o l o r a n d U n d e r t o n e
What is Skin Undertone?
I'm sure you have heard the term 'skin undertone' being thrown around but what does it mean? It's hard to even find a definition of the internet. To simplify things in my eyes, your skin undertone is the base color of your complexion.There are three types of undertone - warm, cool or a blend of both to give you neutral.Warm/Yellow Undertone
Warm undertones are more yellow and red yellow. Skin will look more golden and warm skin tans more easily.
Cool/Pink Undertone
Cool undertones are a mix of reds and blues and are usually rosy pink, rosy beige, dark brown, ebony or have a dark-red. Cool skin usually burns before darkening in color.
Neutral Undertone
blend of both, or are more olive toned, then you have a neutral undertone to your skin.
How Do I Know My Skin Undertone?
There are many ways out there that can be used to find your skin undertone.
Vein Test
This is a popular test to determine your skin tone. In natural light, examine the veins on the underside of your wrist. Veins that show mainly blue are a sign of cool undertones and if they seem green that is a sign of warm undertones. If you see a combo of blue and green, then this may mean you have neutral undertones.
Silver/Gold Test
Warm tones go well with yellow gold while Cool tones go well with silver. If the silver jewelry or clothes makes your skin glow then you are most likely cool toned. While if the gold brightens your skin you are probably warm toned.
White Test
Place a sheet of white paper or even a white towel next to your face. If your skin looks more yellowish then you have warm undertones, if it looks bluish then you have cool undertones and a neutral undertone will look more green.
MY Test
Get matched! By a makeup artist or do it yourself. It's nice to get color matched by a makeup artist at a counter but I have been matched wrong and found my perfect shade and undertone on my own.
If you still have problems determining your skintone and you have access to foundations that you can swatch...then grab warm color (yellow) and a cool color (pink) foundation closest to your shade and swatch on your cheek. Swatching on your face gives a truer match than the back of your hand. Now which one blends in better? Taa daa! If they both look fine then you lucky brute! You are neutral. Simple and effective.
Now Choose Your Color
TIP: Foundation should blend seamlessly into your jawline and neck so if your neck is a different shade match the foundation closer to your neck and remember to blend.
TIP: Foundation may oxidize over time so try to get samples of a couple of shades lighter and darker to see how the color looks after about a hour of wear.
Hope that helps a bit. Happy hunting.
Jul 14, 2010
Tips for Beginners - UNDERSTANDING FOUNDATION
Tips for Beginners - UNDERSTANDING FOUNDATION

I will start by saying this - I am not expert when it comes to foundation so all I can do is pass on what I know and what I have learned.
Check out the Previous Posts: Tips for Beginners - SKIN TYPE
Tips for Beginners - SKIN CARE
What is Foundation?
In cosmetics, foundation is simply a skin-colored product that is applied to the face to even out complexion and cover imperfections.
How do you choose the right foundation?
There are a few basic things to consider when choosing your foundation and those are:
- Coverage
- Foundation Type
- Skin Type
- Foundation Finish
- Color and Undertone (to be discussed in a separate post)
COVERAGE
One of the first things to consider when choosing foundation is the coverage you desire. This means how much of your skin you wish to cover and conceal. This will determine how opaque your foundation will need to be. Be sure not to confuse coverage with the thickness/heaviness of the foundation since coverage is determined by the pigmentation of the foundation. The coverage will be stated in the description of the foundation. The terms often used to describe coverage are outlined below:- Sheer will give the least coverage because it is the least pigmented. It can be used to cover slight unevenness in the skin tone but will not cover imperfections an dark marks. Sheer foundation can always be used with spot concealing to cover more visible areas.
- Light is higher in pigmentation and will cover unevenness and also slight imperfections.
- Medium coverage is the most used and more widely available across makeup brands. It can cover freckles, discolorations, unevenness and even light scars.
- Full coverage is the most opaque with rich pigment. I covers hyperpigmentation, discoloration, freckles, scars, dark spots and marks.

FOUNDATION TYPE
There are a few basic types of foundations - liquid, cream, powder and mineral. Foundations are also now being formulated by skin type and will usually indicate the intended skin type in the description. But here are some basic things to consider when choosing the type of foundation best suited for your skin type.
- Liquid Foundation is the most versatile and can be used by all skin types based on the formulation. Liquid foundation may be oil or emollient-based or water-based.
- Cream Foundation is a thicker consistency and can also be oil or emollient-based or water-based.
- Powder Foundation (or Pressed Powder) is a just what it sounds like and may be used wet or dry or wet/dry depending on the formula.
- Mineral foundation is the newest on the market and is usually in a loose powder form. All makeup is somewhat mineral based so I take this as a marketing ploy to appeal to our 'natural' side.


SKIN TYPE
We have discussed skin type is a previous post. In addition to coverage needs your skin type will also need to be considered when choosing foundation.- Normal Skin is the again the easiest to work with and so they can use almost any foundation on the market depending on specific needs.
- Dry Skin is best suited for liquid or cream foundations and oil-based formulae. Powder and mineral foundations can accentuate dry areas and patches.
- Oily Skin should seek out oil-free, mattifying liquid or cream foundations. Powder and mineral makeup is ideal for oily skin because they are dry and will not add a dewy finish to the skin.
- Combination Skin can use the foundations made for oily skin but can also get away with oil-based foundations if the skin is mostly dry.
- Sensitive Skin makes it difficult to find the perfect foundation. Ingredient lists are key for sensitive skin. Powders are most recommended based on the limited ingredients and preservatives that can be skin irritants. However, if you choose to use other types of foundation then seek out products with minimal ingredients since the less ingredients the less likely one will irritate your skin. It's best to figure out your specific skin irritants so that you can learn to avoid them. For sure that can be quite a chore but the more natural the ingredients the better. Preservatives, fragrances, alcohol, etc. can irritate sensitive. Get ready to do some homework since all sensitive is different and the irritants will vary.


FOUNDATION FINISH
But what about the finish of the foundation? Foundation Finish refers to how the skin looks after applying the foundation - the overall end result.
- Matte finishes produce a no-shine, almost dry result. Matte finishes ae best suited for Oily/Combination Skin but can also look great on Normal skin.
- A Dewy finish leaves skin looking moistened and healthy. Some foundations may use light reflecting particles to produce a 'glow' to the skin. This is best suited to counteract the effects of Dry Skin .
- Satin/Natural finish is the most 'natural' result and is a happy medium between mate and dewy. Skin will look fresh and healthy without the appearance of makeup. This is suitable for all skin types based on your preference.


Subscribe to:
Posts (Atom)