Showing posts with label Illamasqua. Show all posts

Jan 30, 2013

MAKEUP LOOK + TUTORIAL | Speckled Eyeliner

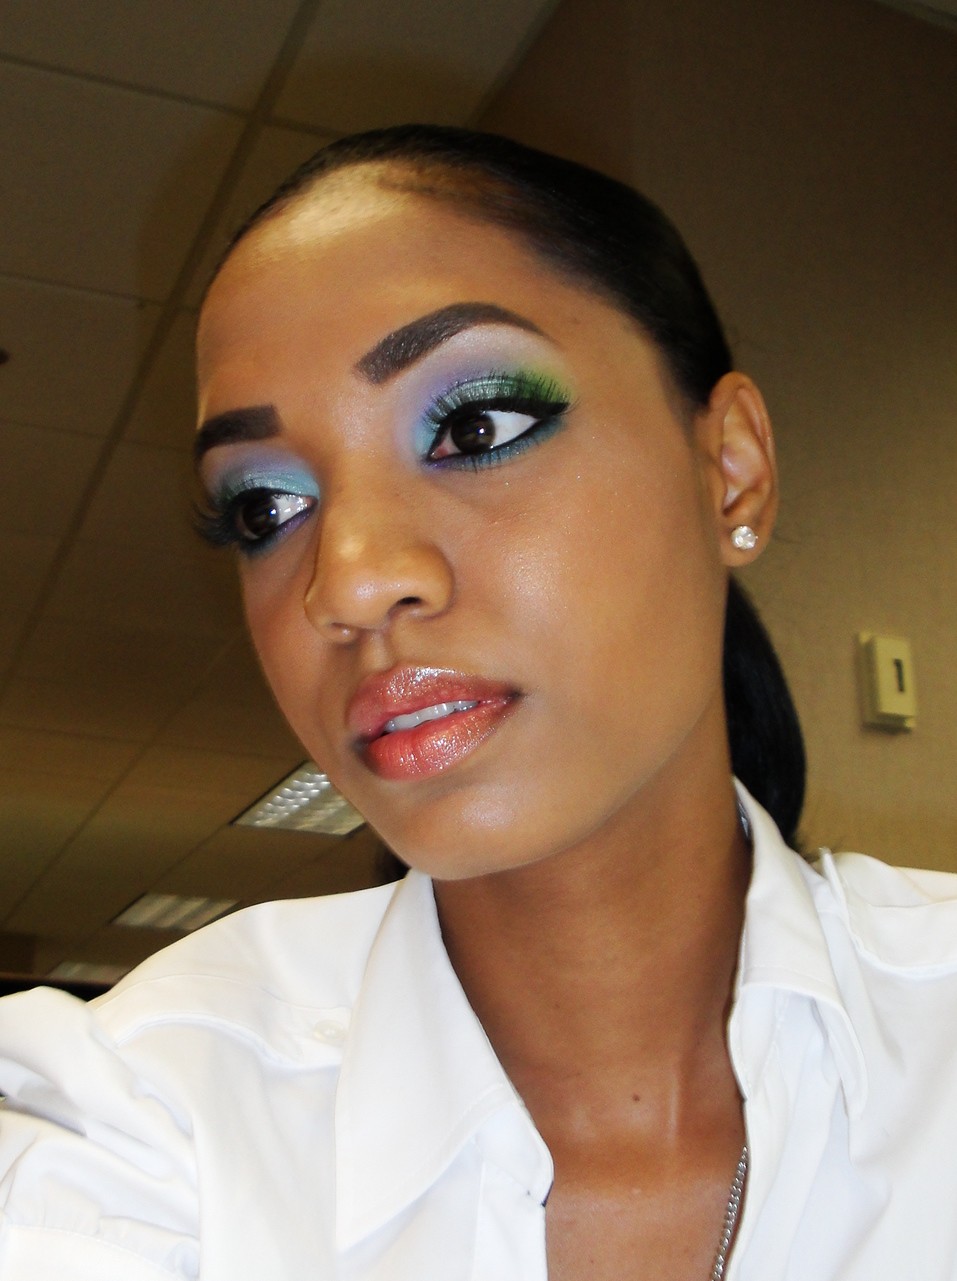
Speckled Eyeliner LOOK


(Inspired by Illamasqua I'mperfection Collection Spring 2013)


Inspiration


Eyes: 
PRIME:
I applied NARS Pro Prime Smudge Proof Eyeshadow Base all over my lid up to the brow bone - fingersI then applied MAC Pro Longwear Concealer in NC35 under my brow - Bare Escentuals Maximum Coverage Concealer Brush. 
For my primary base I used MAC Layin Low Paintpot (creamy nude) on my entire lid and on my browbone area - Real Techniques Deluxe Crease Brush. 
As a secondary base I used Tarte SmolderEYES Amazonian Clay Waterproof Liner in Gold (shimmery gold) on my entire lid and on my browbone area - MAC 239 Eye Shader Brush. 

COLOR:
For the entire lid I applied Urban Decay Shag Deluxe Eyeshadow (frosty tan)MAC 239 Eye Shader Brush
On the crease area I applied MAC Uninterrupted Pro Longwear Eyeshadow (matte camel). Sonia Kashuk Large Crease Brush
For highlight under my brow I used Urban Decay ABC Gum Eyeshadow (matte beige). MAC 252 Large Shader Brush

BROWS:
My brows are filled in with Anastasia Brow Wiz Pencil in Brunette and Anastasia Brow Powder Duo in Ebony (matte brown). Paula Dorf Eye Definer Flat Top Brush

DEFINE:
I lined my upper lashline with Wet 'n' Wild Creme EYeliner in Black. MAC 263 Small Angle Brush

For my my lower waterline I used Tarte SmolderEYES Amazonian Clay Waterproof Liner in Gold (shimmery gold).
To create the white dots I used MAC Pure White Pigment (matte white) with Illamasqua Sealing Gel. Sigma E11 Eyeliner Brush
Then for the black dots I used Benefit Babe Cake Eyeliner in Black with MAC Mixing Medium (water based). Sigma E11 Eyeliner Brush
I used L'Oreal Voluminous Carbon Black Mascara for my lashes and added Beautee Sense Style #212 Eyelashes for effect. Duo Lash Adhesive.


Lips: 
POLISH:
I applied Shiseido Perfect Rouge Lipstick in RD732 Blush (matte pinky nude).


Face: 
FINISH:
I primed my skin with Anthony Logistics For Men Instant Fix Oil Control and Philosophy Turbo Boost C Powder - hands. I used Lancôme Teint Idole Ultra 24H in 460 Suede W - Sigma Flat Top Synthetic Kabuki Brush - for my face and set my t-zone with BareMinerals READY™ SPF 15 Touch Up Veil in Tinted - face puff.

I used Tarte Smooth Operator™ Amazonian Clay Waterproof Concealer in Tan - Sonia Kashuk® Core Tools Synthetic Pointed Foundation Brush - under my eyes set with Ben Nye Banana Powder - Beauty Blender Sponge.

I used MAC Posey Cremeblend Blush (creamy rose) for my cheeks - Shiseido Perfect Foundation Brush and MUFE #2 Sculpting Kit for contour - Sigma Angled Kabuki Brush.


Nov 14, 2011

'Crushed Alluvium' Look

'Crushed Alluvium' Look  

Happy Monday! I am off again to California tomorrow so I will be MIA for a little bit (not too long this time).  Anyhow I wanted to use some new (or better yet waiting products) I picked up earlier this year from Illamasqua. I think Illamasqua makes some gorgeous loose pigments but alas they never quite show up as beautifully on camera or on the skin as they do in the container! And the sparkles just don't show up very well! Grrrrr! They are truly beautiful though and look better in person :)


Eyes: 
PRIME:
I started off with Urban Decay Primer Potion all over my lid up to the brow bone. I applied MAC Layin' Low Paintpot (creamy beige) all over my lid and into the crease as my primary base - Sigma P82 Precision Round Brush. 

COLOR:
For the inner lid and tearduct area I used MAC Sauve Intentions Eyeshadow (shimmery light blue). MAC 239 Eye Shader Brush
On the lid I applied Illamasqua Alluvium Pure Pigment (deep periwinkle with multi-colored shimmer). MAC 242 Small Shader Brush + Inglot Duraline
On the outer lid I applied Rock & Republic Fatalistic Eyeshadow (matte black).  MAC 242 Small Shader Brush
For blending on the browbone area and in the crease I used MAC Wild By Nature Eyeshadow (matte camel). NARS 01 Eye Shader Brush
For highlight I used MAC Blanc Type Eyeshadow (matte ivory). MAC 252 Large Shader Brush

BROWS:
My brows are filled in with MAC Eyebrow Pencil in Stud and NARS Coconut Grove Eyeshadow (matte blackened brown). Cozzette Eyebrow/Mini Shader D230 Brush/Paula Dorf Eye Definer Flat Top Brush

DEFINE:
I lined my upper lashline with Wet 'n' Wild Crème Eyeliner in BlackMAC 263 Small Angle Brush
I lined my lower waterline with L'Oreal HIP Cream Eyeliner in Black. MAC 212 Flat Definer Brush
I used L'Oreal Carbon Black Voluminous Mascara for my lashes and added Ardell #138 Eyelashes for effect. Duo Eyelash Adhesive


Lips: 
POLISH:
For my lips I used MAC Delectable Mattene Lipstick (creamy peach nude) topped with MAC Frankly Fresh Lipglass (creamy nude).


Face: 
FINISH:
I primed my skin with MAC Oil Control Lotion and Inglot Under Makeup Base - hands. I used MAC Pro Longwear Foundation in NC45- Sigma Flat Top Synthetic Kabuki Brush - for my face and set my t-zone with MAC Studio Careblend/Pressed Powder in Dark - face puff.

I used MUFE #12 Full Cover Concealer - Cozzette P350 Cylinder Concealer Brush - under my eyes set with MAC Studio Careblend/Pressed Powder in Medium Deep - face puff

I used MAC Peaches Blush (matte light peach) for my cheeks - Cozzette Contour Stylist S135 Brush - MUFE #2 Sculpting Kit for contour - Cozzette Contour Stylist S135 Brush and MAC Stereo Rose Mineralize Skinfinish for highlight - MAC 109 Small Contour Brush.


 Oh no! Don't fall!
 

Apr 26, 2011

Illamasqua Toxic Nature Collection Cream Pigments - THOUGHTS and SWATCHES...

Illamasqua Toxic Nature Collection Cream Pigments -
THOUGHTS and SWATCHES...


Illamasqua Cream Pigment

The Toxic Nature Collection has spawned a wild spray of corrupted colours and poisonous pastels in an intensely colour-rich, crease resistant, matt formula that introduces a brand new product to the Illamasqua range.

Six neo-toxic colour mutations create the ultimate in textures on your face, eyes, lips or body. Apply with an Illamasqua brush or simply use your fingers for a buildable, water resistant, highly pigmented finish. Layer under Powder Eye Shadow and Pure Pigments for intensity.

Size: 8g/0.28 oz.
Price: $24
Availability: Sephora, Illamasqua

Available Shades:

Bedaub –  Mint

Dab  –  Lilac

Delirium –  Rose taupe *Available in the EU Only

Emerge – Peach *Available in the EU Only

Hollow  – Toffee

Mould  – Grape


*************

My Five Ps

Price 

The Illamasqua Cream Pigments are priced at $24 for 8g/0.28 oz. Of course, the first comparison you may draw is a MAC Paintpot which is $16.50 for 5g/0.17 oz. The Illamasqua Cream Pigments actually work out cheaper per oz. in this case (but not by much) since you get more than 50% more for an additional $7.50. This product is also cheaper per oz. than Make Up For Ever Aqua Cream Colors which are $22 for 0.21 oz.

So although the price may seem a bit high for this product, you are getting your money's worth in quantity so it's just a matter of if it's worth $24 for you.


Purchasing
The Illamasqua Cream Pigments are available at Sephora stores and Sephora.com as well as directly from Illamasqua.com. There are two additional exclusive shades available through Illamasqua -- Delirium (matte rose taupe) and Emerge (matte orange) -- but they are priced at £17.00 and will require a hefty international shipping fee. 


Packaging

The packaging is a rectangular clear plastic jar with concave sides and press-fit black cover. The jar is mostly flat and wide with Illamasqua printed on the black cover and a label indicating the product details on the underside of the clear jar.

There are two major drawbacks to the packaging. First, it's plastic which is not great for the shelf-life (read drying-out time) of cream products. Second, the cover is a press-fit rather than a screw-top which can expose the cream product to air more easily thereby (again) lessening the shelf-life.

So while the packaging is functional, it is not the best for the life span of a cream product. This affects the price for me since even though I am getting a decent amount of product for my money, it may not last long enough for me to get full use of it. 


Product & Performance
The  Illamasqua Cream Pigments are multi-use matte cream products for face, eyes, lips and body and are touted as creaseproof and waterproof. The colors are mostly pastel shades in lilac, mint green, rose taupe, peach, toffee and deep purple with a matte finish. It is truly unique to find some of these shades in a matte cream product so that was a nice treat.


The product has a slightly dry and tacky texture and is not as creamy as one would expect based on other products on the market. While the product is creamy, it is not as moist and silky as other cream products which can be both a positive and a negative depending on how you choose to use it.

On eyes and cheeks it will work well with just a slight drag and is great as a base for powder products because of the tacky texture. For lips it can be a bit drying but very long lasting. The cream clings to skin for long wear and resists fading over time.

The Illamasqua Cream Pigments are highly pigmented (but remember there are pastels), very opaque and require very little product for full color payoff. I used these as lip colors, eyeshadows, eyeshadow bases and cream blush and they worked well for each purpose.

They work the best as cream eyeshadow bases for powder eyeshadows and as a base for lipsticks. They truly helped my eyeshadows and lipsticks last much longer but I recommend using a primer/lip balm prior to applying these since there can be a bit of a tug on the skin.

They also work well as cheek products and some (lighter skin) may find then useful as a cheek contour. Be mindful that the colors are matte so don't expect a glow or sheen to these products.

There are some reviews that call out creasing which is disappointing since Illamasqua claims that these are creaseproof. I did not, personally, experience any creasing when use on my eyes with a primer and there was minimal creasing when used without a primer. I recommend using an eye primer with these just in case you are prone to creasing with cream products.


Overall
I think these are nice products and there are some unique matte shades in the line-up. If you are not into matte pastel colors then these are not for you. But if you adore mattes and have been searching for some nice cream products then check these out. I recommend a primer when using these on your eyes because there have been reports of creasing (although I didn't experience any myself). I am happy to have them but I wouldn't say you would be missing out or heartbroken without them.


*************

Swatches

Bedaub - Mint
This is a great matte pastel mint green color.

**********

 Dab - Lilac
If you ever wanted a matte lilac shade then this is the one for you. Great for pale lilac lips or eyes.


**********

 Hollow - Toffee
This shade will make a great neutral base for darker skin ladies and a great contour shade for ligh skin ladies. It even makes a great nude lipstick or blush.


Jul 13, 2010

'Golden Grape' Look

'Golden Grape' Look

I will say this...I am not happy with this look at all...aside from my love/hate relationship with purple. It looks OK in pictures but in person...ick! I was in a rush with this one (trying not to be late) and didn't have enough time to tweak and refine the overall look. But alas life must go on and I feel the need to share the good and, in this case, the bad.

Eyes:

PRIME:
I started off with NARS Smudge Proof Eyeshadow Base all over my lid up to the brow bone. I also applied MAC Layin Low Paintpot (matte creamy beige) all over my lid and up to my brow bone as my primary base. I also applied Inglot #82 Gel Eyeliner (matte purple) on the lid as a secondary base.

COLOR:
On the inner lid and inner tear-duct area I applied MAC Goldenrod Eyeshadow (matte golden orange).
For the middle of the lid I applied Illamasqua Creep Eyeshadow (matte light lavender).
On the outer lid and crease I applied Illamasqua Preen Eyeshadow (matte purple).
To define the outer V I used MAC Later. Pigment (shimmery blackened purple).
For blending I used Smashbox Nude Eyeshadow (matte nude).
For highlight I used MAC Ricepaper Eyeshadow (shimmery champagne).

BROWS:
My brows are filled in with MAC Eyebrow Pencil in Stud.

DEFINE:
I lined my upper lashline with Wet 'n' Wild Gel Eyeliner in Black.
I lined my lower waterline with L'Oreal HIP Cream Eyeliner in Black.
I used Urban Decay Honey 24/7 Eyeliner (shimmery gold) on my inner lower lashline and Urban Decay Electric 24/7 Eyeliner (shimmery blue) on my outer lower lashline.
I used MAC Haute & Naughty Lash Mascara for my lashes.


Lips:

POLISH:
For my lips I used MAC Jazzed Lipstick topped with MAC Ember Glow Lipglass.

Face:

FINISH:
I prepped my skin with Stila One Step Correct. I used NARS Sheer Glow Foundation in Tahoe with MUFE Full Cover Concealer in #12 under my eyes. I set with MAC Blot Powder in Dark.
I used MAC Instant Chic Blush for my cheeks topped with MAC Stereo Rose MSF.

Jun 28, 2010

'Beach Breeze' Look

'Beach Breeze' Look

I wanted to make use of my MAC Mutiny Pigment which I have never used in a look and this is what I came up with. I recommend getting MAC Parfait Amour Eyeshadow for your collection! It's a beautiful blue-violet color.


Eyes:

PRIME:
I started off with NARS Smudge Proof Eyeshadow Base all over my lid up to the brow bone. I also applied MAC Layin Low Paintpot (matte creamy beige) all over my lid up to my brow bone as my primary base.

COLOR:
On the inner lid I applied MAC Haunting Eyeshadow (satin light blue).
For the lid I applied MAC Mutiny Pigment (frosty light blue).
On the outer lid I applied Inglot #58 Eyeshadow (matte vibrant green).
I used Illamasqua Dare Eyeshadow (matte light green) on the outer crease for blending.
For the inner crease I used MAC Parfait Amour Eyeshadow (frosty blue-violet).
For highlight I used MAC Ricepaper Eyeshadow (shimmery champagne).

BROWS:
My brows are filled in with MAC Eyebrow Pencil in Stud.

DEFINE:
I lined my upper lashline with Wet 'n' Wild Gel Eyeliner in Black.
I lined my lower waterline with Loreal HIP Cream Eyeliner in Black.
I smudged Stila Smudge Stick Eyeliner in Peacock (cobalt blue) on my lower lashline and applied MAC Parfait Amour Eyeshadow to my inner tear duct area.
I used Covergirl Lashblast Mascara in Very Black for my lashes and added Beautee Senses SmashingLashes for effect.

 
Lips:
 
POLISH:
For my lips I used MAC Thrills Lipstick topped with MAC Kumquat Lipglass.

 
Face:
 
FINISH:
I prepped my skin with Stila One Step Primer/Corrector. I used NARS Sheer Glow Foundation in Tahoe with MUFE Full Cover Concealer in #12 under my eyes. I set with MAC Blot Powder in Dark. I used MAC Instant Chic Blush for my cheeks topped with MAC Comfort Mineralized Skinfinish.
I highlighted and contoured my cheeks with MUFE #1 Sculpting Kit.

>