May 29, 2010

Natural Look with Pageant Lips

Natural Look with Pageant Lips
 This is another version of the Natural Look with Bold Lips this time using an OCC  Lip Tar.

Eyes:
PRIME:
I started off with Urban Decay Primer Potion all over my lid up to the brow bone. I also applied MAC Groundwork Paintpot (satin mid-tone neutral) all over my lid up to my brow bone for a touch of color.

BROWS:
My brows are filled in with MAC Eyebrow Pencil in Stud.

DEFINE:
I lined my upper lashline with Stila Stay All Day Eyeliner in Black. I lined my lower waterline with Loreal HIP Cream Eyeliner in Black.
I used MAC Opulash Mascara for my lashes.

Face:
FINISH:
I used MUFE Face and Body Foundation in #18 with MUFE Full Cover Concealer in #12 under my eyes. I set with MAC Blot Powder in Dark. No blush.

Lips:
POLISH:
OCC Pageant Lip Tar with MAC True Babe Lipglass.


May 27, 2010

Bebe Leather Bondage Dress - Work Outfit


Bebe Leather Bondage Dress - Work Outfit

Yes! I am wearing a brown Bebe leather accented bondage dress to work. It's form fitting with a leather corset and leather sleeves. I love this dress. I paired it with simple gold accessories and dark brown suede heels from Shi By Journeys.

'Summer Nude' Look

'Summer Nude' Look

This is a subtle nude look for summer. I used a few waterproof products that I'm giving a test drive and I must say the results are promising so far. I will be doing a quick tutorial on this one for those who prefer simple natural looks.

Eyes:
PRIME:
I started off with Urban Decay Primer Potion all over my lid up to the brow bone. I also applied MAC Layin' Low Paintpot (matte creamy beige) all over my lid up to my brow bone as my primary base.

COLOR:
On the tear duct I applied MAC Mylar Eyeshadow (satin creamy white).
Next on the entire lid, I applied MAC Kid Eyeshadow (satin beige caramel).
On the outer lid and crease I applied MAC Cross Cultural Eyeshadow (matte dark brown).
For the outer V I used MAC Showstopper Eyeshadow (matte blackened brown)
For the blending I used Smashbox Nude Eyeshadow (matte nude).
For highlight I used MAC Ricepaper Eyeshadow (shimmery champagne).

BROWS:
My brows are filled in with MAC Eyebrow Pencil in Stud.

DEFINE:
I lined my upper lashline with Stila Stay All Day Eyeliner in Black. I lined my lower waterline with Loreal HIP Cream Eyeliner in Black.
I used MAC Opulash Mascara for my lashes.


Lips:
POLISH:
OCC Katricia Lip Tar


Face:
FINISH:
I used MUFE Face and Body Foundation in #18 with MUFE Full Cover Concealer in #12 under my eyes. I set with MAC Blot Powder in Dark. No blush.

May 26, 2010

'Red Hot' Look

'Red Hot' Look

So the first thing I have to say is that red and orange eyeshadows do not photograph very well at all. For shame! Plus red is such a difficult color to pull off in eyeshadow...but you know I had to try.


Eyes:
PRIME:
I started off with Urban Decay Primer Potion all over my lid up to the brow bone. I also applied MAC Layin' Low Paintpot (matte creamy beige) all over my lid up to my brow bone as my primary base.

COLOR:
On the tear duct I applied MAC Blanc Type Eyeshadow (matte ivory).
Then on the inner lid I applied MUFE #920 Yellow Gold Star Powder.
Next on the middle of the lid, I applied MUFE #952 Iridescent Orange Star Powder.
On the outer lid and crease I applied MUFE #949 Iridescent Red Star Powder.
For the blending I used Smashbox Nude Eyeshadow (matte nude).
For highlight I used MAC Ricepaper Eyeshadow (shimmery champagne).

BROWS:
My brows are filled in with MAC Eyebrow Pencil in Stud.

DEFINE:
I lined my upper lashline with Stila Stay All Day Eyeliner in Black. I lined my lower waterline with Loreal HIP Cream Eyeliner in Black.
I used MUFE #21 Aqua Cream (vibrant turquoise) topped with MUFE #960 Turquoise Star Powder for my lower lashline.
I used MAC Opulash Mascara for my lashes and added Beautee Senses Princess Eyelashes for effect.


Lips:
POLISH:
OCC Melange Lip Tar and Inglot #543 Lip Gloss.


Face:
FINISH:
I used NARS Sheer Glow Foundation in Tahoe with MUFE Full Cover Concealer in #12 under my eyes. I set with MAC Blot Powder in Dark.
I used MAC Ripe Blush Ombre for my cheeks.

May 25, 2010

'Gray Scale' Look

'Gray Scale' Look

I wanted to try a more daytime smokey look so here's what I came up with....plus I made use of some of my Illamasqua Eyeshadows that haven't been used (ever).

Eyes:

PRIME:
I started off with Urban Decay Primer Potion all over my lid up to the brow bone. I also applied MAC Soft Ochre Paintpot (matte yellow cream) all over my lid up to my brow bone as my primary base.

COLOR:
On the tear duct and inner lid, I applied MAC Blanc Type Eyeshadow (matte ivory).
Next on the lid, I applied Illamasqua Feline Eyeshadow (matte light gray).
On the outer lid and crease I applied Illamasqua Incubus Eyeshadow (matte charcoal gray).
For the outer V and to deepen the crease I used MUFE # Pure Pigment (matte black).
For highlight I used MAC Ricepaper Eyeshadow (shimmery champagne).

BROWS:
My brows are filled in with MAC Eyebrow Pencil in Stud.

DEFINE:
I lined my upper lashline with Wet 'n' Wild Creme Eyeliner in Black.
I lined my lower waterline and lashline with Loreal HIP Cream Eyeliner in Black.
I used MAC Opulash Mascara for my lashes and added Beautee Senses Princess Eyelashes for effect.


Lips:

POLISH:
OCC Melange Lip Tar and Inglot #543 Lip Gloss.


Face:

FINISH:
I used NARS Sheer Glow Foundation in Tahoe with MUFE Full Cover Concealer in #12 under my eyes. I set with MAC Blot Powder in Dark.
I used MAC Gingerly Blush for my cheeks.


Spiked Stilettos

Spiked Stilettos

Have you ever heard the term "Spike Heels"? Well if you have you will appreciate these shoes. These are seriously spiked out stilettos in black and silver. I don't know who I thought I was wearing these to work but so be it. These are from Shi by Journeys (my fave shoe store!).

May 24, 2010

Tropical Island Look - Makeup Tutorial

Model In A Bottle Eyebrow Sealer - Thoughts...

Model In A Bottle Long Lasting Eyebrow Sealer - Thoughts...


Long Lasting Eyebrow Sealer will hold natural brow or any brow make up. Just pick your favorite applicator. The mascara wand for your thicker fuller more natural brow, the brush for you gals with a finer penciled brow. Model in a Bottle Long Lasting Eyebrow Sealer won't dust, shine or flake. It is easily removed with warm water and your favorite cleanser. For use on eyebrows only.

This little bottle will last forever and what a super value at only $12


Ingredients:
SD Alcohol-40B Octylacrylamide/ Acrylates/ Butylaminoethyl Methacrtiate Copolymer, Propylene Glycol, Sodium Sacchairn,Ceytl Alcohol.
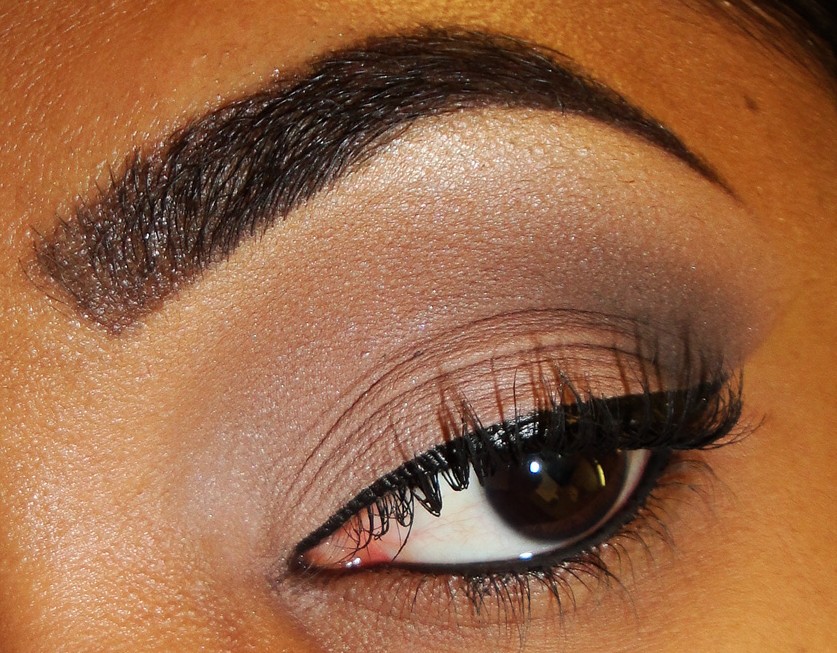

So I bought the Model In A Bottle Eyebrow Sealer at the NYC Makeup Show because you all know I am obsessed with my brows.

According to the information on the Model In A Bottle website (seen above) this is supposed to hold your brows in place without dusting, flaking and shining.
 
My Experience...
 
I was very intrigued by this little bottle and all it purported. I expected results similar to an eyebrow gel or wax which is simply to hold my brows in place throughout the day.
 
I am happy to say that this did more than that. It also made my brow smudge proof and somewhat waterproof. I tested it by going to sleep with my eyebrows filled in and coated in this product. I woke up with my eyebrows still intact which is quite a feat since I sleep with my face smashed into my pillow.
 
I also took a shower with the sealer on my brows but took care not to wash my face. I had a hot shower and water mist was all over my face and am happy to report that my eyebrows stayed in place. When I wiped my face a tiny bit of product came off but not too much.
 
It's a liquid (as in watery) and comes in a nailpolish inspired bottle. It also comes with two applicators - a brush and a spoolie. I do not use either of these because they apply too much product and can smudge the eyebrow product around before it dries.
 
I get a bit of the product on my finger tip and dab on my eyebrows from start to tip. Once this dries my eyebrow stay in palce without smudging until I wash them off.
 
I must note that if you apply too much of the liquid to your eyebrows it will drip and it will flake and it will shine and your eyebrows will be a crispy mess. So use just a little or you will assume that the product is useless.
 
WARNING! DO NOT get into your eyes! Why do I say this? Because I got it INTO my eye!!!
Oh my!!! It burned the hell out of my poor eye. I rinsed and rinsed and my poor eye was red and swollen and not at all happy. It wore off in about 24 hours but make sure to avoid your eyes if you try this product!

Feedback Please...

Feedback Please...

Hey guys!

I need some feedback from you guys. Help! : )

So as you may know...time to time companies will contact bloggers and ask them to review products that they send them (for free of course). I was contacted recently and I'm not sure how I feel or how you guys would feel about having reviews products sent in from companies.

Of course I would be giving my brutally honest opinion to anyone who reads my blog so no need to worry about that. And if I don't like it then you guys will know.

So what do you guys think? Should I accept these products for review? We may be able to find some gems and weed out some bad seeds in the process so...let me know...

BTW...I did my makeup today and I think it looks like crap...I want to just wash my face or wear glasses all day...which I have been doing so far LOL! I will fix it tonight before I share! : )

Luv ya all!

'Flowers and Stripes' Nails

'Flowers and Stripes' Nails


I used:

OPI Lucky Lucky Lavender Nailpolish over the enitre nail.
Konad #M45 Image Plate for the stripe design using Konad Purple Nailpolish.
Konad #M25 Image Plate for the flower design using Konad White Nailpolish.


May 23, 2010

Obsessive Compulsive Cosmetics Lip Tars - Thoughts...

Obsessive Compulsive Cosmetics  Lip Tars - Thoughts...


OCC LIP TAR™
$12.50 USD | 8mL - A stunning new innovation in lip color, OCC Lip Tar combines the longevity of a lipstick, with the ease of application of a gloss. Goes on slick and moist, and dries down to a satin finish. Ultra-saturated in color, Lip Tar contains an unprecedented amount of pigment - a little goes a very, very long way! An intense yet featherweight layer of color that stands up to the scrutiny of Hi-Def Video and Digital Photography, without ever looking (or feeling!) heavy. Meant to be mixed, Lip Tar comes in concise array of colors for a limitless selection of shades made by you!

Like all of our products, OCC Lip Tar is 100% Vegan and Cruelty-Free, and is also free of parabens and other harsh preservatives. A simple, elegant formula that contains Hemp Oil, Peppermint Oil and Vitamin E, OCC Lip Tar feels as good on the lips as it looks!


The website says it all! I really don't know what to add. The description is SO ON POINT!
Lip Tars are lightweight and pigmented. I would compare the lip tars to a liquid lipstick with a lipstain finish. They dry down to a semi matte finish and can be a bit drying so topping them with a clear lipgloss will help. I also suggest a lip primer to prevent bleeding into lip line (which is a possibility with these). There is no taste but there is a slight peppermint scent to the lip tars. I am definitely enjoying these.

UPDATE: I figured out that using these over lip balm or a softening primer helps them stay a bit glossy on the lips. Also, a lip brush is good for these but I have also applied them straight from the tube with no issues. I'm loving how long these stay on even after eating. I prefer them over lipsticks for sure.

I bought 5 of the wearable shades because I don't want to be bothered with mixing the colors to make my own shade: MEMENTO, MELANGE, PAGEANT, HOOCHIE, KATRICIA

SWATCHES

MEMENTO, MELANGE, PAGEANT, HOOCHIE, KATRICIA

 
MEMENTO
 

MELANGE

PAGEANT

HOOCHIE

KATRICIA

>