Pages

Apr 30, 2010

The Instyler Quick Review

The Instyler Quick Review

Yep! I broke down and got the Instyler!

Many of you have probably seen the infomercials about the Instyler Rotating Hot Iron Hair Styler. I decided after much debate to get my hands on it during their $14.99 30-day Trial Offer. So if I didn't like it I wouldn't lose too much. 

Well well well....after my look of the day today, many of you guys commented on my hair. So I decided to do a quick review of the device.

 
Review:


At first it was tricky to use. I had to figure out what angle to hold the iron and how slowly to pull it through my hair and how much hair to do at a time. I recommend watching the online videos at www.getinstyler.com before attacking your own hair.


How did I use it? I washed my hair and conditioned it and let it air dry. I did NOT add any products to my hair because the website says to use on CLEAN hair. I made sure my hair was 95% air dry before using the iron. I used the highest heat setting and let the iron heat up for about a minute. I sectioned my hair in 3 inch sections and worked from back to front.


Section by section, I detangled with my rat-tail comb through to the ends. I then used the rotating barrel to press and rub against my roots to get them straight. Then I clamped my hair between the barrel and the brush and slowly (SLOWLY) moved the iron through my hair down to the ends. I used the device with the barrel under the hair section and the brushes on top. Once my hair was between the two parts, I also slightly turned the iron so that the barrel was aiming up to get a nice curl. I did stay a little longer on the ends to make sure those were shiny and straight,


I didn't use any shining drops and hairspray and taaddaaa! It looks shiny and healthy and bouncy with no additional hair product. So far I am very happy and my TRIAL will become permanent!


'Sour Grapes' Look

'Sour Grapes' Look

SO I realized that I am not a fan of monochromatic looks - one color scheme looks (think light pink to medium pink to dark pink)! I prefer to mix and match my colors and do combos rather than stick to one color palette.

Anybody know the Fable - The Fox and the Grapes...it's has a great lesson...check it out!

\

Eyes:


PRIME:
I started off with Urban Decay Primer Potion all over my lid up to the brow bone. I also applied MAC Painterly Paintpot (matte creamy beige) all over my lid up to my brow bone as my primary base.
 
COLOR:
On the tear duct, I applied MAC Blanc Type Eyeshadow (matte ivory). 
Next on the inner lid, I applied MAC True Chartreuse Pigment (matte lemon/chartreuse green).
Then on the middle of the lid, I applied MAC Chartreuse Pigment (shimmery lemon/chartreuse green).
On the outer lid and crease I applied MAC French Violet Pigment (matte medium purple).
For the outer V I used MAC Rich Purple Pigment (matte dark purple).
For highlight I used MAC Blanc Type Eyeshadow (matte ivory). 
 
BROWS:
My brows are filled in with MAC Eyebrow Pencil in Spiked.

DEFINE:
I lined my upper lashline with Wet 'n' Wild Creme Eyeliner in Black. 
I lined my lower waterline with Loreal HIP Creme Eyeliner in Black and Inglot #87 (teal) Gel Eyeliner.
On my lower lashline I also smudged a bit of MAC Marine Ultra Pigment (matte blue).
I used MAC Opulash Mascara for my lashes.


Lips:

POLISH: 
MAC Siss Lipstick and MAC Sock Hop Lipglass.


Face:

FINISH:
I used NARS Sheer Glow Foundation in Tahoe with MAC Studio Finish Concealer in NW35 under my eyes. I set with MAC Blot Powder in Dark.
I used MAC Vintage Grape Blush Ombre for my cheeks.      


Apr 29, 2010

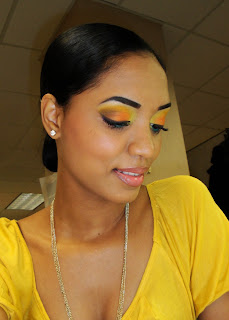
'Bright Spring Sunshine' Look

'Bright Spring Sunshine' Look

I'm feeling a bit under the weather today so I wanted to brighten my day with this look. I was inspired by a YouTube video (hair tutorial but I was focused on her makeup) so I wanted to give it a try. Here's what I came up with...


Eyes:

PRIME:
I started off with Urban Decay Primer Potion all over my lid up to the brow bone. I also applied MAC Soft Ochre Paintpot (matte light yellowy cream) all over my lid up to my brow bone as my primary base.
 
COLOR:
On the inner lid and tear duct, I applied MAC Bright Future Eyeshadow (shimmery yellow).
Next on the middle of the lid, I applied MAC Orange Eyeshadow (matte orange).
On the outer lid and outer V I applied MAC Cross-Cultural Eyeshadow (matte medium brown).
For the crease and brow bone I used MAC Goldenrod Eyeshadow (matte golden yellow ).
For highlight I used MAC Ricepaper Eyeshadow (shimmery champagne gold). 
 
BROWS:
My brows are filled in with MAC Eyebrow Pencil in Stud.

DEFINE:
I lined my upper lashline with MAC Dipdown Fluidline (matte dark brown).
Then I lined my lower waterline with Inglot #82 (purple) and Inglot #87 (teal) Cream Eyeliners.
I used MAC Opulash Mascara for my lashes.

Lips:

POLISH: 
MAC Kinda Sexy Lipstick and MAC Melt In Your Mouth Cremesheen Glass.

Face:

FINISH:
I used NARS Sheer Glow Foundation in Tahoe with MAC Select Moisturecover Concealer in NW35 under my eyes. I set with MAC Blot Powder in Dark.
I used MUFE #22 Sculpting Blush for my cheeks.            

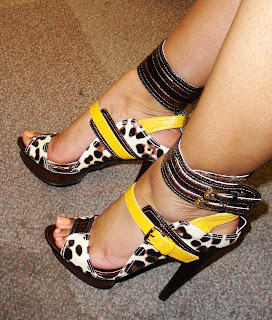
Leopard Print Strap Platform Shoes

Leopard Print Strap Platform Shoes!

So since I'm sharing my shoe sfetish as well as my love for makeup I decided to share another one of my shoes. This time from Love My Shoes and the brand is Wild Rose.

It takes a lot to describe these shoes! They are leopard print and they have ankle straps and they are platforms and they are open toes and they are stilettos and they are yellow and they are brown! And here there are...


Apr 28, 2010

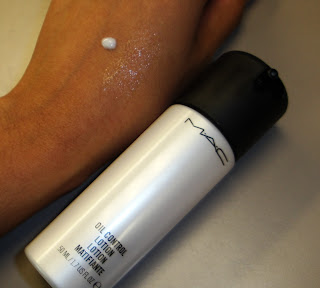
MAC Oil Control Lotion REVIEW

MAC Oil Control Lotion REVIEW

From MAC:


The ultimate no-shine base for oil control. Natural exfoliants help improve texture and clarity. Lightweight and instantly matte, bonds makeup to the skin for fewer touch-ups. Oil-free hydration with natural colloidal minerals and antioxidants. Formulated to keep skin pH-balanced. Use day or night.
50 ml / 1.7 fl oz

US$29.50

From Me:

I tend to do some research before I invest in any makeup or skincare product and found that the MAC Oil Control Lotion received mixed reviews. So I wanted to test this product out for a few weeks before I did a review so that I could get a real feel for the product. 

First off I am an oily girl. LOL. Let's make that clear. I have major problems in my T-zone and can look like I had a grease bath by the end of a long day. But I'm happy to be oily since oily skin has less aging issues down the road.


My 4 P's...


The Packaging is ideal. It comes in a pump action bottle much like Fix + with the added locking function. The pump dispenses small amounts of product at a time allowing for great control of how much is used. It's compact and easy to travel with because of the locking feature of the pump. No unintentional squirting in your luggage here.

The Price is a bit on the high side but when compared to similar high end products it falls in line. One bottle will last almost a year or more depending on how much you use it so it's worth it to me.
The Product itself is a lightweight lotion that goes on clear and dries down to a matte finish. It leaves your skin feeling moisturized but not tight as a lot of mattifiers have been know to do. It sinks into the skin pretty well with no greasy feeling left over. It also does not have the slippery feel of silicone based primers. Many people use this as a primer in addition to their moisturizer because it is so lightweight. Personally I don't need an additional moisturizer since this gives me just the right amount I need. It blends well with my foundation and helps it stay in place all day.

The Performance for me has been superb! The effects are gradual as it is for many skincare products. The first day I used it I was impressed but not overly so since I still had to touch up during the day. By the 5th day I was down to 1 touch-up versus 3. And by week 2 I did not touching up over my 9 hour days. So don't expect instant gratification with this product. Just give it a week for better results.

 I will buy this product over and over! This is now my go to moisturizer/primer! This comes Highly Recommended by moi!


BCBG Purple Shoes

BCBG Purple Shoes

Here are some of my favorite shoes that I own. This is a BCBG Peep-toe Stiletto with an ankle strap. I may not love purple eyeshadow but I love my purple shoes!

'Lovely Cherry Blooms' Look

'Lovely Cherry Blooms' Look

So here I go with another purple mix this time incorporating some pinks and greens. I also broke out with my Blooming  Lovely Lipstick which I LOVE! I defined the crease somewhat with the purple but not to the extreme.


Eyes:

PRIME:
I started off with Urban Decay Primer Potion all over my lid up to the brow bone. I also applied MAC Layin Low Paintpot all over my lid up to my brow bone as my primary base.
 
COLOR:
On the inner tear duct area, I applied Sugarpill Buttercupcake Eyeshadow (matte yellow). 
Next on the inner lid, I applied MAC Polished Ivory Pigment (matte ivory).
Next on the middle of the lid, I applied Inglot #361 Eyeshadow (matte bright pink).
On the outer lid and crease I applied MUFE #92 Eyeshadow (matte vibrant purple).
For the brow bone I used MUFE  #9 Eyeshadow (matte vibrant lavender).
For highlight I used MAC Ricepaper Eyeshadow (shimmery champagne gold). 
 
BROWS:
My brows are filled in with MAC Eyebrow Pencil in Stud.

DEFINE:
I lined my upper lashline with MUFE #22 Aqua Cream Color (shimmery green).
Then I lined my lower lashline with Bourjois Metallic Eyeliner in Bleu Clinquant (shimmery blue).
I lined my lower waterline with Loreal HIP Creme Eyeliner in Black. 
I used MAC Opulash Mascara for my lashes and Beautee Senses Demi Pixies Eyelashes.


Lips:

POLISH: 
MAC Blooming Lovely Lipstick and MAC Lavender Wind Lipglass.


Face:

FINISH:
I used NARS Sheer Glow Foundation in Tahoe with MAC Select Moisturecover Concealer in NW35 under my eyes. I set with MAC Blot Powder in Dark.
I used MUFE #12 Sculpting Blush for my cheeks.            


Apr 27, 2010

My Version of Gladiator Shoes

My Version of Gladiator Shoes

So I didn't fall into the fad of Gladiator shoes and sandals because it just wasn't me. But I found a great hybrid platform dominatrix style that was right up my alley. What do you guys think???

I found these at Shi by Journeys and they were on sale as well (bonus!).


P.S. It's funny how my ankles look fat in pictures! LMAO!!!

'Seafoam Grape' Look

'Seafoam Grape' Look

Thanks so much for the feedback from my Purple Rain Look. : ) But I still hate all purple looks on me...LOL! So I decided to wear purple the way I prefer and that is to mix it with different colors....so here goes...


Eyes:

PRIME:
I started off with Urban Decay Primer Potion all over my lid up to the brow bone. I also applied MAC Layin Low Paintpot all over my lid up to my brow bone as my primary base. Then I applied Inglot #82 Creme Eyeliner (matte purple) lightly in the crease as a secondary  base. 
 
COLOR:
On the inner corner, I applied Sugarpill Buttercupcake Eyeshadow (matte yellow). 
Next on the middle of the lid, I applied Inglot #372 Eyeshadow (matte teal/green).
On the outer lid and crease I applied Illasmasqua Preen Eyeshadow (matte purple).
For blending I used MAC Brule Eyeshadow (soft muted creamy-beige).
For highlight I used MAC Ricepaper Eyeshadow (shimmery champagne gold). 
 
BROWS:
My brows are filled in with MAC Eyebrow Pencil in Stud.

DEFINE:
I lined my upper lashline with Inglot #82 Creme Eyeliner (matte purple).
Then I lined my outer lower lashline with MAC Undercurrent Pearlglide Eyeliner (teal/green with gold sparkles) and inner lower lashline with MUFE #4 Metal Powder (metallic yellow gold).
I lined my lower waterline with Loreal HIP Creme Eyeliner in Black. 
I used MAC Opulash Mascara for my lashes and Beautee Senses Smashing Eyelashes.


Lips:

POLISH: 
MAC Stylesetter Pro Longwear Lipstain Marker and MAC Lavender Wind lipglass.


Face:

FINISH:
I used NARS Sheer Glow Foundation in Tahoe with MAC Select Moisturecover Concealer in NW35 under my eyes. I set with MAC Blot Powder in Dark.
I used MUFE #6 HD Microfinish Blush for my cheeks.